Welcome to My Kitchen!

SusanV I'm SusanV, and I love good food. Join me as I create delicious dishes made with whole foods and without a lot of processed fat and sugar. Want to know more? Check out my FAQs, look through my recipe index, or get inside info on Facebook. Like what you see? Then subscribe to receive email updates. But above all, enjoy!


Latest Recipe


On FatFree Vegan Today

On FatFree Vegan Today


Current Faves


Sweet Potato Falafel

Skillet Gardener's Pie

Easy Mac and Cheeze
Easy Mac and Cheeze

Vegan Corned Beef and Cabbage

Colcannon Puffs
Colcannon Puffs


 Subscribe to comments


Recipe Index


Previous Posts


Archives


Posts by Topic

Cats | CORE* | Crock-Pot | Dogs | Eat to Live | E Cooks | Events | Flowers | Gardening | Gluten-Free* | Higher-Fat* | Holidays | Life | Louisiana | Nature | Pasta | Pressure Cooker | Ridiculously Easy | Southern Cooking | Soy | Travel  | Vita-Mix

*CORE designation is an approximation; this site has no affiliation with Weight Watchers International. Higher-fat recipes derive more than 15% calories from fat. Recipes marked gluten-free depend on use of specially-labeled gluten-free ingredients.

Search for Recipes:

Search Over 600 Vegetarian and Vegan Blogs:


Monday, July 31, 2006

Pineapple Coffee Cake

"This recipe was tested on animals."

That was my daughter's way of admitting that she had been feeding the cat pieces of cake under the table. I laughed so hard I nearly choked on my own cake. E. has picked up enough from me to know that I think animal testing is a bad thing, so she assured me that the cat liked the cake and therefore wasn't hurt by the testing.

We were celebrating my husband's birthday with pineapple coffee cake and Equal Exchange French Vanilla coffee (E. had chocolate soymilk). I consider myself a lucky woman to have a husband who not only is kind, loving, and smart as hell but also has a relatively small sweet tooth and doesn't mind having a birthday cake that's just as good for him as it is good. Not only is this cake completely free of added fats, it also uses only whole wheat and oat flour--no white flour at all--and contains very little sugar. It's a dense cake without being heavy, and the sprinkling of sugar on top gives it a sweet crunch. I strongly recommend using a coarse sugar such as demerara or raw sugar for the topping--it keeps its shape during baking and provides that crunch.

Pineapple Coffee Cake

Pineapple Coffee Cake
(click for printer-friendly version)

Dry Ingredients:
1 cup quick or whole oats (not instant)
1 cup whole wheat flour
1/2 cup vegan sugar (I used demerara)
2 teaspoons baking powder
1 1/2 teaspoons Ener-G Egg Replacer
1/2 teaspoon ground cinnamon
1/2 teaspoon baking soda
1/2 teaspoon salt

Wet Ingredients:
3 tablespoons water
1 tablespoon white or cider vinegar
1 cup crushed pineapple packed in pineapple juice, undrained
1/3 cup unsweetened applesauce

Topping:
2 tablespoons coarse sugar, such as demerara or raw sugar
1/2 teaspoon cinnamon

Preheat the oven to 350 F. Lightly spray or wipe the bottom and sides of a 8 X 8-inch glass baking pan with oil or cooking spray. (You may use metal, but the baking time will vary.)

Put the oats into a blender and grind until they are fine. Stir a couple of times to make sure that they're uniformly ground.

Mix the oat flour with the other dry ingredients. Add the wet ingredients and stir until moistened and completely combined, but don't overmix. Pour into the prepared pan (batter will be thick). Mix together the sugar and cinnamon topping, and sprinkle it over the top.

Bake for 30-40 minutes, until a toothpick inserted in the middle comes out clean. Allow to cool for at least 15 minutes. Eat and celebrate!

Makes about 9 pieces. Each piece contains: 155 Calories (kcal); 1 g Total Fat; (4% calories from fat); 3 g Protein; 36 g Carbohydrate; 0 mg Cholesterol; 299 mg Sodium; 3 g Fiber.

Tags:

Bookmark and Share AddThis Feed Button


Saturday, July 29, 2006

Thai Red Curry with Mango Chutney

While researching uses for mango chutney, I stumbled upon a recipe for Crawfish Curry that I just had to try to veganize. Anything that combines elements of Louisiana cooking with Thai and Indian cuisine is just mixed-up enough for me. I had to lose the crawfish, though, and since nothing can ever really replicate its taste and texture, I didn't even try. I just marinated tofu to instill a bit of flavor and then let the other ingredients carry the dish. And with 2 tablespoons of red curry paste, it's a flavorful dish indeed!

Oh, in case you wondered, the recipe still uses Louisiana cooking techniques, even if it doesn't contain the crawfish. Browning the onion, pepper, and flour and adding broth to form a roux is a standard Creole way to thicken up and season food. It works well in this recipe, forming a rich, thick sauce that coats the tofu and zucchini in spiciness.

Thai Red Curry with Mango Chutney

Thai Red Curry with Mango Chutney
(click for printer-friendly version)

1 package (14-16 ounces) extra-firm tofu, cut into 1/2-inch cubes
2 tablespoons soy sauce
1 tablespoon lime juice

1 medium yellow onion, chopped
1 red bell pepper, diced
1 green bell pepper, diced
1 teaspoon garlic, finely chopped
2 tablespoons flour
3 cups of fat-free vegetable broth
1 teaspoon nori flakes (or other crushed seaweed)
1/2 cup crushed pineapple, with juice
1-2 tablespoons vegan Thai red curry paste (check ingredients and nutrition info carefully*)
3 medium zucchini, diced
4 cups mung bean or soy sprouts, blanched in boiling water for 1 minute, drained and rinsed in cold water
Green Mango Chutney

Marinate the tofu cubes in the soy sauce and lemon for at least half an hour. Stir or shake often to cover all the pieces.

Heat a large, non-stick wok or sauce pan over medium-high heat, and add the onion, peppers, and garlic. Cook, stirring, until onions are becoming tender, about 8 minutes. Add the flour, stirring constantly, and cook, stirring and scraping the bottom of the pan, for about 2 more minutes, until the flour begins to brown.

Continue to stir as you add the vegetable broth, nori flakes, crushed pineapple, and curry paste. Turn down the heat to low and simmer until it's thickened, about 20 minutes.

Meanwhile, add the tofu and its marinade to a hot, non-stick skillet. Cook, stirring gently, until all the liquid has evaporated. Continue to cook without stirring until the tofu is browned on one side; then turn it over to brown on all sides. Add it to the curry mixture.

Return the skillet to the heat, and sauté the diced zucchini until it is tender but still crisp. Add it to the curry mixture. Cook the curry for about 5 more minutes. Serve over rice, sprinkled with bean sprouts and topped, if you like, with mango salsa. Serves about 5.

*To be sure the curry paste is vegan, I recommend Thai Kitchen brand. I've had some nasty surprises when using the kind in cans (MaeSri brand) at the Asian market. It may not say "shrimp paste" on the label, but if you check this website, it's listed there. Plus, where there should be no cholesterol if it's vegan, often there will be some amount listed in the nutritional breakdown. Use caution!

Makes 5 servings. Each serving, without rice or chutney, contains: 192 Calories (kcal); 6 g Total Fat; (25% calories from fat); 15 g Protein; 24 g Carbohydrate; 0 mg Cholesterol; 657 mg Sodium; 5 g Fiber.

Tags:

Labels: ,

Bookmark and Share AddThis Feed Button


Friday, July 28, 2006

Green Mango Chutney

I was at the local Indian grocery store earlier this week, checking to see if the dal shortage is affecting my area (no shortage of dal on the shelves, but prices are up about 30 cents per pound), and I picked up a huge, green mango with the idea of making chutney. While researching ways to use chutney, I came across an unusual recipe for Crawfish Curry with Mango Chutney that I just had to attempt to veganize. So yesterday morning I made the chutney and served it with the curry last night.

The curry recipe includes instructions for making a simple mango chutney, but I followed my own recipe, which is spicier and gave me a chance to use one of the many jalapeño peppers from my garden.

Green Mango Chutney

Green Mango Chutney

1 large or two regular-sized green mangoes, about 2 pounds
1 tsp. canola oil (this little bit is necessary to temper the spices)
1 tbsp. minced fresh ginger
1/2 teaspoon cumin seeds
1/2 teaspoon black mustard seeds
1 cup water
1/2 teaspoon salt
1/4 cup jaggery, demerara, or other sugar (add more if using very tart fruit)
1 jalapeño pepper, de-seeded and minced
1/4 - 1/2 teaspoon cayenne or red chili pepper
2 tbsp. lime juice
2 tbsp. white vinegar

Peel the mangoes and dice the flesh. Heat the oil in a large, non-stick saucepan and add the ginger. Stir-fry for one minute, and then add the cumin and mustard seeds. Cook for 1-2 minutes, until the seeds begin to pop, and then add the chopped mango. Cook, stirring, for about 2 minutes.

Add the remaining ingredients, bring to a boil, and then reduce heat to low. Simmer until the mango becomes translucent and the chutney is thick, from 30 to 60 minutes depending on the ripeness of the mangoes. As it's cooking, check for sweetness, and add a little more sugar if necessary. Cool and store in jars in the refrigerator. Makes about 2-3 cups.

divider

The "crawfish" curry was delicious both with the chutney and without. Check back later to see how I veganized the recipe. For now, here are a few other ways to use mango chutney:
  • spread it on crackers or toast points for a zesty appetizer
  • use it as a dip for pappadums or tortilla chips
  • stir a few spoonfuls into rice or other grain for a quick side dish
  • use it to top a baked sweet potato
  • thin it with some white wine vinegar and you've got a great fat-free salad dressing
  • got an excess of zucchini? stir-fry the zukes and add a couple of tablespoons of mango salsa at the end for a sweet & sour vegetable dish
  • perk up grilled vegetables with a dollop of mango chutney

What are your favorite ways to use chutney? I've got about 2 cups of it left, so I'm open to suggestions!

Tags:

Labels:

Bookmark and Share AddThis Feed Button


Thursday, July 27, 2006

Spiced Lentils and Rice

I apologize for teasing you with a dish and then not posting it. My only excuse is that my daughter is home with me now full-time--no summer camp, no swim team--and she is bored, "heavy bored," as the poet John Berryman said. Finding activities to occupy her is taxing all my resources (as well as my limited sanity). Fortunately, she goes back to school in less than two weeks, and neither of us can wait.

As I mentioned, this is a "throw it all into your rice cooker and walk away" recipe. I've recently started experimenting with putting foods other than rice into the rice cooker, and I love not having to watch over it as it cooks. The one I own is a super-cheapie Black & Decker with two settings, Cook and Warm. I'm not exactly thrilled with its performance, so I suggest getting a more expensive, fuzzy-logic type of rice cooker if you can afford it. If not, the inexpensive ones work well, though I've found that I absolutely have to spray or brush the bottom of mine with oil, or it spits viscous, white droplets out of its vent-hole as it cooks, covering my upper cabinets and counter tops with rice spittle. A tiny bit of oil keeps it from foaming. I don't know if that's a problem with all Black & Deckers, but it keeps me from wholeheartedly recommending the one I have.

In this recipe, the lentils break down partially and become almost "meaty" because they cook more quickly than brown rice. I like the texture, but if you prefer the lentils to retain their shapes, try adding them to the cooker after the rice has cooked for 10 minutes. Note that this dish is "spiced," not spicy: cinnamon, cloves, and cumin give it a warm, rich flavor, but no heat.

Spiced Lentils and Rice

Spiced Lentils and Rice

1 1/2 cup brown rice
3/4 cup lentils
2 cinnamon sticks, broken in half
6 cloves
1/2 tsp. cumin
1/4 tsp. ground black pepper
1 tsp. salt (optional)
1/4 cup minced parsley

Put all ingredients except parsley into the rice cooker. Add water according to your rice cooker's instruction manual or use 4 cups of water. Stir and set to Cook. When the cooker shuts off, check to make sure both rice and lentils are tender and no water remains. If they are not tender, add 1/4 cup more water and restart. (This shouldn't be necessary, but rice cookers do vary.)

When done, remove the cinnamon and cloves, fluff the rice, and add the minced parsley. Serves about 6.

To cook it on the stovetop, follow the same directions, but increase the water to 4 1/2 cups. Bring to a boil, cover tightly, and cook on low until water is absorbed, about 45 minutes.

Tags:

Labels: ,

Bookmark and Share AddThis Feed Button


Tuesday, July 25, 2006

Ful Medames (Fava Bean Dip)

I've been taking a break from cooking for the past few days. On Friday I made my favorite lasagna, but after that, I didn't cook one thing, unless you count steamed vegetables, until Monday night. With my husband out of town, my daughter and I happily dined on leftovers and take-out from the local natural food store. I think I needed a little cooking break.

But last night I got back into the swing of things with an easy meal that all three of us enjoyed. I put a batch of Spiced Lentils and Rice into the rice cooker, and while it was cooking, I prepared a salad and a dip for pita bread. We have hummus so often that I thought we were due for a change, and this version of Ful Medames, a delicious dip made of cooked fava beans, really hit the spot.

Foul Moudammes

Ful Medames (Fava Bean Dip)

1 medium onion, chopped
3 cloves garlic, minced
2 medium tomatoes, chopped
2 cans (3 cups) fava beans, rinsed and drained
1 tsp. ground cumin
1/4 tsp. cayenne or red chili pepper
3 tbsp. lemon juice
1/4 cup parsley

Sauté the onion and garlic in a large, non-stick skillet for about 4 minutes. Add the tomatoes and cook for another 4 minutes. Stir in the fava beans, cumin, and red pepper, and cook on medium-low heat for about 10 minutes.

Remove from the heat and mash the fava beans lightly, right in the skillet, until most of the beans are mashed. Scoop into a serving bowl, and mix in the lemon juice and parsley. Serve with warm pita bread.

Hint: Look for canned fava beans in Middle Eastern grocery stores. Some common spellings are ful medames, foul moudammes, foul mudammes, and foul moudammas.

Makes 5 servings. Per serving: 174 Calories (kcal); 1 g Total Fat; (5% calories from fat); 10 g Protein; 37g Carbohydrate; 0 mg Cholesterol; 587 mg Sodium; 7 g Fiber.

Tags:

Labels: ,

Bookmark and Share AddThis Feed Button


Friday, July 21, 2006

Inari Sushi and Kale with Mushrooms and Water Chestnuts

Inari

Every now and then I prepare a meal that I've been reluctant to blog about because it's not at all fat-free. Inari are rice-stuffed pouches made of fried tofu, and they're very easy to make if you buy Inarizushi No Moto in a can. I've been working on a way to make the pouches myself, without frying, but I just haven't gotten to it yet. After all, inari is a convenience food, and I seem to forget about making it until I'm in a hurry to throw together a meal.

I threw together such a meal a few days ago, using the evil (but tasty) fried inari pouches. I did manage to get some of the fat out by rinsing the inari in hot water and wringing them out before I filled them. I was happy to find that they retained their delicious sweet and sour taste even after rinsing.

There's no real recipe for my inari, but I can tell you what I do. I cook about 1 cup of short-grained brown rice in my rice cooker until it is done. While it is cooking, I chop up 2 carrots and half of a large, seeded cucumber. When the rice is almost done, I add the carrots and some frozen peas (3/4 cup maybe) to the cooker, just on top of the rice; I close it up and let it complete its cooking (if the rice isn't tender, add a quarter cup of water and turn it back on--sometimes this is necessary when cooking rice with additional ingredients).

When the rice is done, I turn it out into a bowl, add the chopped cucumber, and toss it all with seasoned rice vinegar. I just add it until it tastes good to me. (Start with 1/8 cup and add more from there; it should have a distinctly vinegary taste, but not overpoweringly so.) I use the seasoned rice vinegar that already has salt and sugar, but if you're using regular rice vinegar, dissolve a little salt (1/2 tsp.) and sugar (2 tsp.) in it beforehand.

After the rice is cool enough to handle, I stuff it into the pre-rinsed pouches. I like to over-stuff mine and never bother with folding the edges over to "hide" the filling. The more rice inside, the better, in my opinion! Serve the inari with Ponzu Sauce (citrus-flavored soy sauce), lots of wasabi, and sliced pickled ginger.


The over-stuffed inari were complemented by a sweet yet tangy vegetable dish that turned out to be the surprise hit of the meal. I used dinosaur (lacinato) kale and regular mushrooms, but you can use regular kale, bok choy, or most any other green along with any mushroom you like. But don't leave out the water chestnuts, which give it some crunch, and use Ponzu, if you can, for that hint of citrus.

Kale with Mushrooms and Water Chestnuts

1 bunch of kale, or other greens
1/2 tsp. dark sesame oil
12 ounces mushrooms, sliced
1 tsp. minced or grated ginger
2 cloves garlic, minced
1/4 cup vegetable broth
1 8-ounce can sliced water chestnuts, rinsed and drained
2-4 tbsp. Ponzu or soy sauce (to taste)
1 tsp. rice wine vinegar
1 tsp. sugar or other sweetener

Wash the kale and remove any tough stems. Chop the leaves into bite-sized pieces and set aside.

Heat the sesame oil in a large skillet or wok. Add the mushrooms, ginger, and garlic, and stir-fry until mushrooms start to become tender. Add the kale and broth and cover immediately. Cook on medium heat, checking often to make sure that the water hasn't all evaporated, until the kale is tender, about 5-9 minutes. (Add more broth if it becomes dry.) When the kale is tender, remove the cover and add the water chestnuts. Cook uncovered for 2 minutes. Stir in the remaining ingredients, cook for one more minute, and serve.

divider

And don't worry--as soon as I come up with a recipe for non-fried inari pouches, you'll be the first to know!

Tags:

Labels: ,

Bookmark and Share AddThis Feed Button


Wednesday, July 19, 2006

Artichoke Pesto Pasta Salad

Last weekend I attended yet another potluck dinner. Something about the summer just screams "potluck," I guess. For this one, I threw together not one but two pesto pasta salads: a regular one made with semolina pasta and olive oil, to share with the crowd, and a fat-free, healthier version made with whole wheat pasta for myself.

I'm going to be honest with you. I tasted both, and the regular one was better. Part of the blame for that goes to the whole wheat pasta I used in the oil-free version. I've never been a big fan of whole wheat pasta, but the brand I used this time tasted like tough, damp cardboard. The pesto sauce itself wasn't bad. I used canned artichokes to replace the olive oil and omitted the nuts I normally use, and though I think it could have used those nuts blended into the sauce and perhaps some vegan parmesan, other than that, it was pretty tasty. But, for an oil-free pesto that's really outstanding, I have to recommend either the Asparagus Pesto Pasta Salad that I blogged about last month or my creamy Pesto Pasta Salad that's based on silken tofu.

Artichoke Pesto Pasta Salad

Artichoke Pesto Pasta Salad

1 cup basil, packed
1 can quartered artichoke hearts (packed in water)
1-2 cloves garlic
1 tbsp. nutritional yeast
2 tbsp. vegetable broth
1/2 tbsp. lemon juice
salt, to taste
8 ounces whole wheat pasta, cooked
1 large tomato, diced
1/4 cup toasted pine nuts (optional)

Place the basil and 3 artichoke hearts (12 quarters) in a food processor, and pulse to coarsely chop. Add the garlic, nutritional yeast, vegetable broth, and lemon juice, and process until it becomes a thick paste. Add salt to taste.

In a serving bowl, combine the cooked pasta with the pesto and blend well. Add the remaining artichoke hearts, the tomato, and the pine nuts and toss. Serve at room temperature.

Makes 4 servings.

Per serving (with pinenuts): 366 Calories (kcal); 6 g Total Fat; (13% calories from fat); 19 g Protein; 70 g Carbohydrate; 0 mg Cholesterol; 116 mg Sodium; 19 g Fiber.

Without pinenuts: 318 Calories (kcal); 2 g Total Fat; (4% calories from fat); 17 g Protein; 69 g Carbohydrate; 0mg Cholesterol; 116 mg Sodium; 19 g Fiber.

Tags:

Labels: ,

Bookmark and Share AddThis Feed Button


Tuesday, July 18, 2006

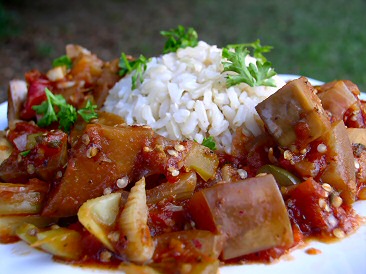
Eggplant Creole

I needed a vegetable dish to go along with the Okara "Crab" Cakes, so Sunday's dinner included this vegan version of the traditional Louisiana dish Shrimp Creole. I chose eggplant to replace the shrimp, not because it tastes anything like shrimp but because, unlike most vegetables, it holds its shape without becoming mushy and it absorbs the flavors of the sauce like a sponge.

This turned out delicious with just the right level of spiciness and enough of that Creole taste to satisfy this native Louisianian. I used Zatarains' Crab and Shrimp Boil to give it the flavor that I associate with shrimp, but I have since discovered that it contains an ingredient (polysorbate 80) that may be animal-derived. I suggest you substitute Tabasco or another Cajun seasoning blend.

Eggplant Creole

Eggplant Creole
(click for printer-friendly version)

1 medium onion, diced
1/2 bell pepper, chopped
2 ribs celery, chopped
2 cloves garlic, minced
1 lb. eggplant, diced into 1/2-inch cubes
1 15-ounce can salt-free diced tomatoes
2 tbsp. tomato paste
1 cup vegetable broth
2 tbsp. minced parsley
1 tsp. dried thyme
1/2 tsp. Zatarains' liquid Crab Boil hot sauce, to taste
1/8 tsp. red pepper (to taste)
1/8 tsp. white pepper
1/4 tsp. celery seed
freshly ground pepper
1/2 tsp. powdered nori (or other seaweed)
1/2 tsp. sugar
salt, to taste

Sauté onion, bell pepper, celery, and garlic in a large skillet over medium heat for about 3 minutes, adding water if necessary to prevent sticking. Add eggplant and sauté for 5 more minutes.

Add remaining ingredients, reduce heat, and cook until eggplant is completely tender, about 20-30 minutes. Serve over rice, garnished with additional parsley.

Serves 4. Each serving (without rice) contains 149 Calories (kcal); trace Total Fat; (2% calories from fat); 2 g Protein; 37 g Carbohydrate; 0mg Cholesterol; 102 mg Sodium; 4 g Fiber.

This recipe is respectfully submitted to Sweeetnicks' Tuesday round-up of Antioxidant-Rich Recipes.

Tags:

Labels: , ,

Bookmark and Share AddThis Feed Button


Monday, July 17, 2006

Okara "Crab" Cakes

If you make your own soymilk, you know what okara is--it's the soy pulp that's left after all the "milk" is strained out. And if you've been throwing it out, you need to stop that right now because it's very valuable stuff: It has almost as much protein as tofu but has 32 times as much fiber. It's much closer to being a whole, unprocessed food than tofu and soymilk because it contains most of the original soybean.

Okara can be used in many ways; you can add it to baked goods, use it as an egg substitute, add it to soups and stews, or mix it into veggie burgers. Ever since I started making soymilk, I've experimented a lot with okara, but the following is my all-time favorite okara recipe. In fact, it's so good that I would actually consider making soymilk just to get the okara to make "crab" cakes. They're spicy, creamy, and crunchy all at the same time, and they taste so much like crab that it's scary!

Okara Crab Cakes

Okara "Crab" Cakes
(click for printer-friendly recipe)

See the note at the end of the recipe for using tofu instead of okara.

2 slices whole wheat bread, broken into large pieces
1/2 cup minced celery (use a food processor to chop all vegetables quickly)
1 large onion, chopped
2 carrots, minced
1/2 green pepper, minced
1/4 cup chopped parsley
1 1/2 cups okara (about what you get from making one batch of soymilk in a soymilk machine)
1/2 cup oatmeal (the quick kind, not instant)
1-2 tbsp. Old Bay seasoning
1 tsp. nori or dulse flakes (may use other flaked sea vegetable)

In a food processor or blender, whirl bread pieces into fine crumbs. Place on a baking sheet and toast in the oven for 8 to 10 minutes, or until dried and toasty. Remove from oven and set aside.

In a non-stick skillet, cook celery, onion, carrot, pepper and parsley until softened, about 5 minutes.

In a large bowl, combine okara, sautéed vegetable mixture, oatmeal, and seasonings. Mix well and set aside to "rest" for 10 minutes.

Preheat oven to 350° F. Using about 1/4 cup for each cake, form mixture into about 15-20 patties about 2 inches across and 1/2 inch thick. Coat each side of the patty with bread crumbs and place on a nonstick baking sheet. Bake 15 minutes. Carefully turn cakes over and return to the oven to bake until second side is toasty and browned, about 15-20 minutes.

These are delicious served with spicy cocktail sauce or vegan tartar sauce; they also make an excellent sandwich on French bread.

Note: If you don't have okara, you can use tofu instead but you may need to add more or less oatmeal. Drain and mash the tofu well and add oatmeal until the mixture will hold together when you try to make it into patties.

Makes 4 servings. Per serving: 195 Calories (kcal); 5 g Total Fat; (22% calories from fat); 8 g Protein; 35 g Carbohydrate; 0 mg Cholesterol; 154 mg Sodium; 15 g Fiber; 3.5 Weight Watcher's points

For more info on okara, check out Ellen's Kitchen.

Tags:

Labels: ,

Bookmark and Share AddThis Feed Button


Friday, July 14, 2006

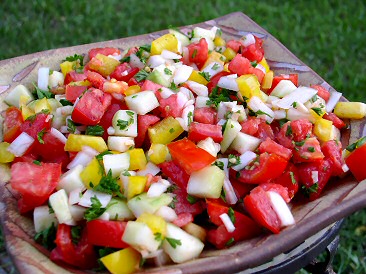
Ezme Salatasi (Turkish Tomato Salad)

I'm going to admit right up front that I'm not sure whether I'm posting this photo because I liked the recipe or because I wanted to show off the bowl that I got in a little art gallery in Hotchkiss, Colorado. Don't get me wrong. The salad was good--light and cool and it really went well with the hummus and baba ganoush I made for dinner last night. But the bowl--mocha brown with shiny, copper-colored stripes of glazing--is a work of art. Too bad that pesky salad is covering most of it up!

Middle Eastern-Style Tomato Salad

Ezme Salatasi (Turkish Tomato Salad)

2 large tomatoes (or 4 medium), chopped
1/2 large cucumber, peeled and diced
1/2 yellow pepper, seeded and chopped
1 small onion, diced
2 cloves garlic, minced
1/2 cup parsley, finely chopped
2 tablespoons lemon juice
1 tablespoon red wine vinegar
2 tablespoons Spicy V-8 (or tomato juice)
generous grating black pepper
1/2 teaspoon paprika
1/4 teaspoon cumin
salt to taste (optional)

Combine all ingredients and mix well. Serve immediately or chill for an hour. Try it in a pita with hummus or on top of a green salad.

Tags:

Labels: ,

Bookmark and Share AddThis Feed Button


Thursday, July 13, 2006

Patty Pan Squash Stuffed with Cajun White Beans

You would have thought I'd never seen fresh vegetables. My husband wanted to shop as men do: Get in, get something, and get out. But I dragged him from stall to stall at the farmer's market, comparing the quality of the tomatoes and zucchini, sighing in disappointment that I'd gotten there too late to get the okra, and marveling at the beautiful produce that I can't find at Kroger--bitter melons, long beans, white eggplant, and organically-grown yellow patty pan squash.

Before Baking
Stuffed squash before baking

The squash were beautiful, and I wish I'd taken a photo of them before they were cooked: bright yellow with a ring of variegated green at the bottom. I knew when I bought them that I was going to stuff them. The man who sold them to me said to use sausage, and then remarked, "Every time I say that, I find out I'm talking to a vegetarian." "You are again! You come across that many vegetarians?" "A lot of them. But you could use cheese instead."

I let that go and started pondering what I, a no-refined-foods vegan, would use instead of sausage or cheese. How about beans that taste like sausage? With Cajun seasonings?

Oh boy! That was a good choice, and I knew it as soon as the fennel hit the pan. I started with all the seasonings that normally go into Louisiana cooking and added fennel and sage to create a rich, sausage-like flavor. There's a hint of spiciness here, too, so go easy on the black and cayenne pepper if you're spice-sensitive. But by all means, try it! The peppery taste of the beans provides a bold contrast to the tender, buttery squash. Patty pans are the perfect shape for stuffing, but if you can't find them, you can use zucchini or a winter squash. And a word to my carb-conscious friends: Patty pans are summer squash, so they're low in calories and carbohydrates; they're considered a "free" food on most diet plans, so eat up!

Stuffed Patty Pan Squash

Patty Pan Squash Stuffed with Cajun White Beans
(click here for printer-friendly version)

4 medium-sized patty pan squash
1 small onion, chopped fine
1 stalk celery, chopped fine
1/2 bell pepper, chopped fine
2 cloves minced garlic
1 tsp. thyme
1/8 tsp. cayenne
1/8 tsp. black pepper
1/2 tsp. oregano
1/2 tsp. basil
1/2 tsp. fennel seed
1/4 tsp. rubbed sage
1/2 tsp. salt (optional)
1 can (15 ounces) great northern beans (or other white beans), rinsed and drained

Place the squash flat side down in a large pot. Add about 1 inch of water, cover, and bring to a boil. Cook for about 8 minutes, until a fork easily pierces the top of the squash. Remove from the pot and set aside to cool.

When cool enough to handle, slice off the top of the squash and use a melon baller to scoop out the flesh from the inside. Be sure to leave a wall of at least 1/4-inch of flesh on all sides of the squash. Turn them upside down to drain, and dice the scooped out flesh coarsely.

Preheat the oven to 375 F.

Sauté the onions, celery and bell pepper in a large, non-stick skillet for about 5 minutes until soft; add garlic, diced squash, and remaining seasonings and cook for another 2 minutes. Add the white beans and cook on low heat for about 5 minutes.

Place the squash in an 8x8-inch baking pan. Spoon the stuffing into each shell; be sure to really pack it into the shell, and don't be afraid to over-stuff them. Pile any stuffing that remains into the center of the baking pan, right between the squash.

Bake for about 20 minutes or until the tops begin to brown. Serve with additional stuffing. Serves 2 as a main dish or 4 as a side dish.

Note: I was recently asked to provide nutritional data about the recipes. The following is based on the program I use, MasterCook, which is not guaranteed to be 100% accurate. If it's important to you, please check the counts yourself, using NutritionData.com or another reliable reference tool.

Two stuffed squashes contain: 335 Calories (kcal); 2 g Total Fat; (4% calories from fat); 22 g Protein; 71 g Carbohydrate; 0 mg Cholesterol; 570 mg Sodium (using optional salt).

Tags:

Labels: , , ,

Bookmark and Share AddThis Feed Button


Monday, July 10, 2006

Pinakbet

When I first started this blog, I vowed that I was going to write about the failures as well as the successes. I've been lucky. There have been some recipes that I would tweak here and there to improve them, but I haven't had any out and out failures--recipes that I just couldn't recommend. Until now.

Which is sad because I'd been thinking of making Pinakbet, a vegetable stew from the Philippines, for weeks. I'd found the recipe when I'd bought okra, fresh lima beans, and eggplant and searched all my cookbooks for a recipe that used all three. The only trouble was that the characteristic flavor of Pinakbet came from the one ingredient I didn't have, bitter melon. So I decided that the recipe wasn't worth making if I didn't have the main ingredient, and I set it aside.

Then this weekend, I saw bitter melons at the Mississippi Farmer's Market. I never would have guessed that anyone was growing them here, but there they were, along with long beans (for which I've always had to substitute regular green beans) and Japanese eggplants. I was so happy to see the bitter melons that I bought four, forgetting that the recipe called for only half of one.

Bitter melon and other veggies
Bitter melon with Japanese and white eggplants and long beans

So I used one of the small bitter melons, some of the long beans, and all of the Japanese eggplant and made Pinakbet last night. I followed the recipe in Madhur Jaffrey's World of the East Vegetarian Cooking almost exactly--I left out the oil, of course, and used a little more eggplant just because I didn't want to have one lone eggplant left over. Then we sat down to eat it and . . . yuck! Even though the bitter melon makes up only a small part of the dish, the taste is overwhelming. I couldn't taste the garlic or the ginger, only the bitterness. I forced myself to take a second and then a third bite, and I have to admit it got more tolerable as I ate it. I was actually able to eat most of the bowl, though I didn't eat the bitter melon itself. I felt I had to make the effort because I just didn't want to waste all the lovely eggplant, fresh tomatoes, and other vegetables that I'd put into this stew.

My daughter gave up after one bite, and my husband managed to choke down maybe half a bowl. The rest, I'm afraid to say, is going into the compost pile. I'll bet bitter melons are good for the soil!

I'll give you the recipe, but be sure to take a look at the suggestions for cooking bitter melon in the comments below. I'm sure that it was my cooking that was to blame for this failed meal, so please don't make the mistakes I did!

Pinakbet

Pinakbet

3 oz. bitter melon (seeds removed and cut into 1/2-inch by 2-inch strips, then salted, set aside for 20 minutes, and rinsed)
1 lb. long eggplants, cut into 2-inch sections
salt
10 whole okra, trimmed
5 oz. long beans, trimmed, cut into 3-inch lengths
5 quarter-sized pieces ginger
3 cloves garlic, slivered
1 med. onion, chopped
1 1/2 lbs. ripe tomatoes, chopped
4 tsp. Japanese soy sauce
1 1/2 cups fresh or frozen Lima beans

Brown the ginger, garlic, and onion. Add the tomatoes and cook for a few minutes. Add two cups of water and the remaining ingredients. Simmer vigorously for 20 minutes, stirring often. It's done when the liquid is thick and the vegetables are tender. Add salt if necessary, remove the ginger, and serve. Good luck!

Oh, here's a coincidence: check out what's over at Albion Cooks!

Tags:

Labels: ,

Bookmark and Share AddThis Feed Button


Friday, July 07, 2006

A Garden Update and Recipe

I've been having to race against birds this summer. Not a flying race, of course, but an eating one. They want to eat all the best tomatoes in my garden just before they're completely ripe, and I've had my heart broken several times when I've gone out to harvest the biggest, reddest tomato only to find that it had been half-eaten overnight. So I've resorted to picking them earlier than I normally would and letting them ripen in the window. Even with the competition from the birds, I've got a window-full of ripe tomatoes now, enough that I'm starting to cook with them a little, rather than just devouring them raw, juices running down my chin as I eat them over the sink. (Sorry, not a pretty picture!)

In other garden news, my prolific basil hit its peak today, and I spent the morning harvesting it. I saved a little to use over the next few days and froze the rest in ice cube trays to get us through the bleak, basil-less days of winter. Then I went right back outside and planted a second crop, this time some Thai and Black Opal varieties. I'm hoping that in a month or so I'll be overrun with basil again. For now I'm content with having a house and hands that smell like pesto.

After working with the basil all morning, you'd think I'd be sick of the stuff, but somehow I wasn't. I was hungry, though, and I wanted something a little different for lunch, so I decided to throw together a hummus-like dip using roasted tomatoes and basil. And it was great, bursting with fresh, sweet tomatoes, peppery basil, and garlic--but zero added fat.

Roasted Tomato Bean Dip

Roasted Tomato Bean Dip
(yet another hummus!)

2 medium-large tomatoes
4 cloves garlic, minced (divided)
freshly ground black pepper, dried oregano, and salt (optional)

1 1/2 cups cooked chickpeas, drained
2 tsp. white balsamic vinegar (or lemon juice)
10-12 large leaves fresh basil
salt, to taste (optional)

Preheat the oven to 400 F. Slice the tomatoes into 1/2-inch slices and place them in a large, oiled baking dish in a single layer. Sprinkle each slice with garlic, using only half of the garlic. Add a sprinkling of black pepper, oregano, and salt to the top of each slice. (You can also add olive oil, but I resisted the temptation.)

Place in the oven for about 30 minutes, until tomatoes are totally cooked but are not burning. Remove from oven to cool (or use warm and then chill the dip after preparing).

Place the remaining garlic into the food processor along with the chickpeas, vinegar, and roasted tomatoes. Blend well. Add the basil leaves and salt, if you like, and blend again. Serve chilled with vegetables or crackers for dipping. Also makes a good sandwich spread or salad dressing.

Tags:

Labels: , , ,

Bookmark and Share AddThis Feed Button


Thursday, July 06, 2006

International Quinoa Salad

International Quinoa Salad

Whenever my husband sees that I'm cooking quinoa, his eyes light up and he asks if I'm making "The Salad." It's our favorite quinoa dish, but for a while I made it only on special occasions because I couldn't figure out how to make it without using olive oil. I was just afraid that it wouldn't be as tasty--and who can stand to see a favorite dish diminished? But I was determined to try to lighten up the recipe so that we could enjoy this fantastic salad more often, and I'm proud to say that I've done it. I think that this recipe is so good that you'll never miss the olive oil.

It's based on a recipe by Lorna Sass called Quinoa Salpiçon, a sort of South American version of the Middle Eastern grain salad tabouli, with lots of parsley as in tabouli but using quinoa instead of bulgur wheat. I like to think of it as a blend of cultures, a little of the Old World mixed with the New, though even the "new" ingredients date back thousands of years. Quinoa was first cultivated 5000 years ago. It was a staple food of the people in the Andes Mountains in Peru and Bolivia and was considered a sacred grain of the Incas. Chickpeas were first cultivated around 7000 years ago in Turkey, but their use spread from there to western Europe, and they've become an important part of the diets of many cultures.

I took the original salad and added a few ingredients--the corn and chili powder to enhance its South American flavor and the chickpeas to complement its Middle Eastern roots. And, of course, I've made it oil-free. The result is wonderful--tiny pearls of quinoa drenched in tangy, chili-seasoned dressing, with cubes of avocado that melt in your mouth and cucumbers and chickpeas for a little bit of crunch. It's a perfect marriage of ingredients--and cultures.


International Quinoa Salad
(click for printer-friendly version)

Quinoa:

1 1/2 cups quinoa, rinsed very well
2 1/4 cups water
1 clove garlic, minced or pressed
1/2 tsp. salt (optional)

Vegetables:

1 large cucumber, peeled, seeded, and diced
2 medium-large tomatoes, finely chopped
kernels of 2 ears of cooked corn (about 1 cup)
1 jalapeño pepper, seeded and diced
1 1/2 cups cooked chickpeas
1/2 cup scallions, thinly sliced
2/3 cup parsley -- minced
1/3 cup fresh mint -- minced
1 ripe avocado, peeled, pitted, and diced (reserve a few slices for garnish)

Dressing:

1/4 cup freshly squeezed lime juice (NOT lemon)
3 tablespoons vegetable broth or bean cooking liquid
1/2 teaspoon salt, or to taste (optional)
1/8 teaspoon ground pepper
1 clove garlic, pressed or minced
1/4 - 1/2 teaspoon chipotle chili pepper

To cook the quinoa in a pressure cooker, place it and the water, garlic, and salt in the cooker and lock the lid. Over high heat, bring to high pressure and cook for one minute. Remove from heat and allow the pressure to come down naturally. Fluff the quinoa and allow it to cool.

Combine all of the vegetables in a large bowl. Add the quinoa and mix well. Whisk the dressing ingredients together and pour over the salad. Mix well and refrigerate until chilled. Taste before serving, and add more lime juice as necessary (you want it to be tangy). Garnish with avocado slices and serve. Makes about 10 servings.

Tags:

Labels: , ,

Bookmark and Share AddThis Feed Button


Wednesday, July 05, 2006

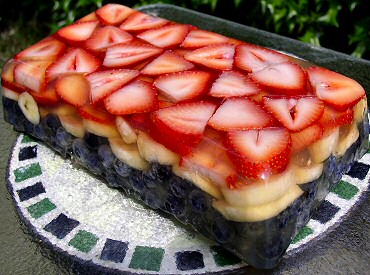
Red, White, and Blue Fruit Terrine

Here's a light, summery dessert that will dress up any picnic table and not blow your diet. I used a white grape/peach 100% juice blend and added agar to create a healthy, updated "Jell-O" mold. The red, white, and blue layers are also 100% fruit--and 100% adaptable. Use your favorite combination of fruits, though some, such as kiwi, pineapple, fresh figs, papaya, mango, and peaches, contain enzymes which break down the gelling ability of agar (although cooking the fruit seems to solve this problem).

Red, White, and Blue Fruit Terrine

Red, White, and Blue Fruit Terrine
(printer-friendly version)

2 cups white grape-peach juice (or juice of choice)
1 1/2 tsp. agar powder
2 tbsp. agave nectar (optional--use only if your fruit is not very sweet))
10 ounces strawberries
2 bananas
1 1/2 cups blueberries

Put one cup of the juice in a saucepan, and sprinkle the agar over it and allow it to soften for a few minutes. Then, heat on medium-high, stirring, until the agar is completely dissolved and the juice begins to boil. Stir in the remaining juice and the agave (optional) and remove from heat.

Allow the agar mixture to cool slightly while you prepare the fruit. Be sure to stir the juice every minute or so.

Remove the stems from the strawberries and slice them lengthwise. Place them on the bottom of a loaf pan, prettiest sides down. Slice the bananas and place them on top of the strawberries. Put the blueberries in an even layer on top of the bananas.

Gently pour the juice mixture evenly over the berries. It will start to jell immediately, so work from side to side to make sure it's distributed evenly. Cover with plastic wrap and refrigerate until completely chilled and jelled. Invert over a platter to serve (you may need to lower the pan into a large bowl of hot water to loosen the edges and run a knife along the inside of the mold.)

Strawberries and blueberries are among the most antioxidant-rich foods; blueberries especially have been proven to do everything from improving night vision to fighting cancer to lowering cholesterol! Each week, Cate at Sweetnicks hosts a round-up of antioxidant-rich recipes from blogs around the world, and this is my contribution for the week. Check out the other entries when she posts the round-up later today.

Inspiration for this delicious dessert came from Berry and Banana Terrine at Simply Recipes.

Tags:

Labels: , ,

Bookmark and Share AddThis Feed Button


Saturday, July 01, 2006

Mexican Lasagna (or Enchilada Casserole)

When my daughter E. has a friend over for dinner for the first time, my first thought is often the same as what I imagine her friends' parents think when E. comes to visit for the first time: "Oh no, what will I feed her!" Most kids come packing all sorts of food baggage: This one hates onions but likes broccoli, that one won't eat anything green but likes beans, as long as they're baked in barbeque sauce. When you're used to feeding a child who has been vegetarian from birth, you lose touch with what "normal" kids eat: Lose the hummus--it looks "gross" to little Sally; Molly hasn't ever had sushi, which, of course, means she won't touch it.

So I tend to stick to very basic recipes when kids are visiting: spaghetti with marinara sauce, bean burritos, and stir-fries (for the kids who will eat vegetables). This can make it appear to their parents that we eat the same boring things week after week, but at least their children don't starve while they're here.

Last night, we had a young visitor for dinner, one who I knew liked Mexican food, so I decided to prepare a family favorite that we haven't had in a long time (since before I started this blog, in fact). It's based on a recipe for No-Roll Enchiladas that has become very popular over at Fatfree Vegan Recipes, but I've renamed it Mexican Lasagna because that's what my daughter calls it. It's a great dish for visiting food critics (a.k.a. kids) and for potluck dinners, and it was a big hit last night, even though our visitor did manage to pick out all the black beans and leave them on the side of her plate. Oh well. Everybody doesn't like something!

Enchilada

Mexican Lasagna (or Enchilada Casserole)
(click for printer-friendly version)

1/2 large green bell pepper, chopped
1/2 large red bell pepper, chopped
1/2 jalapeño pepper, finely chopped (optional)
2 cloves garlic, minced
1 large onion, chopped
corn tortillas--at least 12
3 cups (28 ounces) fatfree refried beans
2 medium tomatoes, diced
1 tsp. chili powder, divided
1/2 tsp. cumin, divided
3 cups black beans, rinsed and drained
1 cup salsa
1 can enchilada sauce (or 1 1/2 cups homemade)
sliced black olives

Preheat oven to 375 F.

In a non-stick pan with a little water (1 tbsp.), sauté the peppers, garlic, and onion for about 3 minutes, or until softened. Set aside.

Spray a 9 X 13-inch baking pan with non-stick spray. Line the bottom with a layer of tortillas (you may cut some of them to fit). Make sure you cover the entire bottom of the pan.

Stir the refried beans and spread half of them evenly over the tortillas. Cover the refried beans with half of the pepper-onion mixture and half of the tomatoes; sprinkle with half of the seasonings and half of the black beans.

Add another layer of tortillas and repeat the layers of the other ingredients. Spread the cup of salsa over the final layer of black beans. Cover with a final layer of tortillas, pour the enchilada sauce over the top, and sprinkle with black olives. Cover and bake for about 30 minutes or until hot throughout. It will be easier to cut if you allow it to cool for about 10 minutes before serving.

Note: Fresh corn is a great addition to this. I use about 2 cups of uncooked (or frozen) corn and add it as one more layer. You may need a deeper pan, though.

Makes about 8 large servings. Each serving contains 319 Calories (kcal); 5g Total Fat; (13% calories from fat); 15g Protein; 56g Carbohydrate; 9mg Cholesterol; 601mg Sodium; 14g Fiber. Weight Watchers 6 Flex points.


Tags:

Labels: ,

Bookmark and Share AddThis Feed Button