Welcome to My Kitchen!

SusanV I'm SusanV, and I love good food. Join me as I create delicious dishes made with whole foods and without a lot of processed fat and sugar. Want to know more? Check out my FAQs, look through my recipe index, or get inside info on Facebook. Like what you see? Then subscribe to receive email updates. But above all, enjoy!


Latest Recipe


On FatFree Vegan Today

On FatFree Vegan Today


Current Faves


Sweet Potato Falafel

Skillet Gardener's Pie

Easy Mac and Cheeze
Easy Mac and Cheeze

Vegan Corned Beef and Cabbage

Colcannon Puffs
Colcannon Puffs


 Subscribe to comments


Recipe Index


Previous Posts


Archives


Posts by Topic

Cats | CORE* | Crock-Pot | Dogs | Eat to Live | E Cooks | Events | Flowers | Gardening | Gluten-Free* | Higher-Fat* | Holidays | Life | Louisiana | Nature | Pasta | Pressure Cooker | Ridiculously Easy | Southern Cooking | Soy | Travel  | Vita-Mix

*CORE designation is an approximation; this site has no affiliation with Weight Watchers International. Higher-fat recipes derive more than 15% calories from fat. Recipes marked gluten-free depend on use of specially-labeled gluten-free ingredients.

Search for Recipes:

Search Over 600 Vegetarian and Vegan Blogs:


Thursday, November 30, 2006

Grilled Skewered Vegetables with Quick Polenta

Grilled Vegetables and Polenta

I seem to buy an average of one new cookbook a week, and the sad thing is, I rarely use them. I keep piles of them beside my bed, on my desk, and next to my chair in the den, and I often glance through them (especially if there are pretty pictures) looking for inspiration, but I rarely just pick one up and follow a recipe.

But I was looking through my newest acquisition, Verdura: Vegetables Italian Style by Viana La Place, when a recipe caught my eye: Grilled Skewered Vegetables. It wasn't that it was innovative or different; it was simply that I had all the ingredients on-hand, and the author suggested serving it with polenta. Since I've recently learned a fast and easy way to make polenta in the microwave, I've been looking for ways to use it.

Both recipes are simple and work well together. Start your vegetables first, so they can be marinating while the polenta is chilling. You'll need to get this started early in the day, but it comes together quickly at dinnertime. You can even prepare the polenta the day before, but don't let the vegetables sit that long or they won't be fresh. Both recipes make about 4 servings.

Grilled

Grilled Skewered Vegetables
(adapted from Verdura)

1 red pepper
1 green pepper
3 medium zucchini
8-10 shiitake mushrooms
1/2 pound butternut squash
1 teaspoon thyme
1 teaspoon rosemary
2 large garlic cloves, minced
salt and freshly ground pepper, to taste
olive oil spray (I use a Misto sprayer with extra virgin)

Cut the peppers and zucchini into 1-inch chunks. Trim the stems off of the mushrooms and slice them in half. Peel the butternut squash and cut into 1-inch chunks.

Put the vegetables into a bowl and spray lightly with the olive oil. Add all the remaining ingredients, toss, and let stand for at least an hour.

Preheat the oven broiler. Put the vegetables onto skewers, alternating ingredients. Place the skewers across a baking dish so that the skewer touches the sides, but the vegetables do not touch the dish (I used an 11X9-inch dish). Place under the broiler, turning often, and cooking until the vegetables are tender. Watch carefully so that they don't burn!

Quick Microwave Polenta

Okay, I know some of you have a prejudice against the microwave, but let me tell you, it's a wonderful tool for making polenta that doesn't have to be stirred constantly--and doesn't have lumps! This was adapted from a recipe I found on the internet.

2 cups water
1/2 cup plus 1 tbsp. yellow cornmeal (use yellow--it's healthier than white)
1 teaspoon salt (optional)
1 teaspoon extra virgin olive oil or margarine (optional)
generous grating of black pepper
basil, oregano, or other herbs (optional and to taste)

Put the water, cornmeal, and salt into a large microwavable casserole dish or 1-quart measure. Cook at full power for 6 minutes. Stir well and cook again at high power for 4 more minutes. Remove from the microwave, stir in the optional oil or margarine, the pepper, and any optional herbs you'd like. Stir well.

Oil a loaf pan or any container that holds about 2 cups. (I've done this in a plastic cup to make tubular polenta.) Pour in the polenta and smooth over the top. Refrigerate until chilled and solid. Remove from the pan and slice about 1/2-inch thick. Brown in a lightly-oiled non-stick pan.

Serve the polenta and the grilled veggies with an optional sprinkling of balsamic vinegar. I rounded out this meal with Cannellini Beans with Fresh Basil and Oregano. It was all delicious, but mmmm, that roasted butternut squash!

Tags:

Labels:

Bookmark and Share AddThis Feed Button


Tuesday, November 28, 2006

Quick and Delicious Collards

Over the holiday, we ate more unhealthy restaurant food than I care to admit, so when we got home, I was ready for a little good home-cooking. Since I didn't have the energy to make anything fancy, I thought I'd keep it simple and unblogworthy. I had some organic collards that I'd bought before we left town and 3/4 of a butternut squash; I figured I'd cook them and heat up some beans and we'd have a healthy dinner, but nothing to write here about.

I tossed the cubes of butternut squash with a teaspoon of zest and a tablespoon of juice from one of my dad's lemons, sprinkled it with freshly ground pepper, and put it in the oven at 400F to bake. While it was roasting, I heated the beans and started chopping the collards. Since I had a little time, I took a couple of shots of the collards, both raw and cooked, then put them back into the pot to keep warm. Once the squash was tender, we ate . . . and we marveled. My husband said that it was one of the best meals he's had. (I didn't really think about that comment at the time, but I'm choosing now to take it as a compliment.) Daughter E. loved the squash and designated it kid-friendly, even though I told her it wouldn't be on the blog. And, biggest surprise of all, little Miss Greens-Hater ate all of her collards without complaint!

So, I was happy I had photographed the greens, at least. This is easily the best-tasting and fastest collards recipe I've ever made. Southern cooks have been known to simmer collard greens for hours, but these took less than 7 minutes in the pressure cooker. The nearly-caramelized onions and garlic infuse them with flavor, and cut into thin strands like this, they're kind of fun to eat. I'm suddenly feeling very happy that I planted collard greens in my garden again this fall!

Super-fast Collard Greens

Quick and Delicious Collards

1-2 bunches collard greens (as much as your pressure cooker will hold)
1 large onion, peeled and cut into thin rings
2 tablespoons water
2-3 cloves garlic, minced
generous pinch of red pepper flakes
1 cup water

Cut off the stems of the collard greens, removing any part of the central stem that seems tough. Stack 2 or 3 leaves on top of each other, roll them up so that they form a long tube, and cut them into thin strands:

Sliced Collard Greens

Repeat with all the collards.

Spray the bottom of the pressure cooker lightly with olive oil and heat. Add the onions and 2 tablespoons water and cook, stirring, until the water evaporates. Keep cooking and stirring until the onions start to brown. Add the garlic and red pepper flakes, and cook for 1 more minute.

Stir in the collard greens, add the 1 cup of water, and seal the cooker. Bring to high pressure and then reduce heat to keep the cooker at high pressure for 3 minutes. (If you are using small, baby collards, cook at high pressure for only 1 minute.) Remove from heat and use a quick-release method to reduce the pressure. Check the collards for tenderness; if they're still tough, put them back on the heat, but don't seal the cooker. Cook until tender. Salt, if desired, and serve (using a slotted spoon) with additional red pepper flakes.

Tags:

Labels: , , ,

Bookmark and Share AddThis Feed Button


Monday, November 27, 2006

Post-Thanksgiving Edition

We had a great Thanksgiving with D.'s family in New Orleans. It was a short trip, but we got to visit with a lot of family members. We had plenty to eat at Thanksgiving dinner, with the highlight being my sister-in-law's vegan cornbread dressing. Of the dishes I brought, the two big hits were the Cranberry Relish and this Sweet Potato Casserole with pecan topping:

Sweet

I'll save the sweet potato recipe to post closer to Christmas because it's not fat-free and I'm currently over my quota of decadent recipes. But I promise you, it's worth waiting for: Creamy sweet potatoes seasoned with cinnamon and freshly grated nutmeg with a maple-pecan topping.

Before we left the city, I insisted that we take the time to shop at my favorite grocery store, a huge Asian supermarket called the Hong Kong Market. It's just a few blocks away from D.'s mom's house, so whenever we visit, we bring home loads of foods that we just can't find in Jackson, such as roasted gluten (which appears to be dehydrated seitan), cherimoyas, purple potatoes, various sauces and types of rice, and tiny Thai eggplants:

Thai Eggplants

On our way home, we stopped at my parents' house to do a little "shopping" right from their garden. Unfortunately, my parents weren't in town, but we had their permission to pick some fruit. So, after a little picnic on their back porch, we got to business. Some of us worked hard...
E picking calamondins

...while others enjoyed the sunshine and country air:
Jazzy

We picked so many of these huge Meyer lemons that I'll just have to make a pie soon:
Lemons

And we scored a bunch of navel oranges and pink grapefruits, too....
Navel Oranges and Grapefruit

There were a few persimmons left on the trees...
Persimmons on tree

...but we left them alone since my father had already picked us a bag full. We even picked a few things that we couldn't identify. I guess I'll know after I peel them whether these are oranges or tangerines:
Mystery Citrus

What we picked the most of, however, is a fruit that most people haven't heard of:
Calamondins

These are calamondins. They're not quite as sour as lemons but nowhere near as sweet as oranges. D. and I love to squeeze them into hot tea. They also make a great pie.

We took a little time to admire the flowers...
Azalea and Yellow Flower

...and to appreciate the more unusual plant life...
Cacti and Citrus Stock

...and then we headed back north to Mississippi, where I'll have to start putting our harvest to good use.

Hope you all had a great weekend!

Tags:

Labels: , , ,

Bookmark and Share AddThis Feed Button


Wednesday, November 22, 2006

The Best Vegan Green Bean Casserole

Best Vegan Green Bean CasseroleI just had to write a quick post about this recipe because D. and I just had some for lunch and oh my gosh, it is good! Truly, we were scraping the little casserole dish clean.

This is adapted and plagiarized from Alanna's World's Best Green Bean Casserole, and I have to say, the name fits. I made up a full recipe to bring to Thanksgiving at the in-laws' tomorrow, but I set aside this small dish to bake today just for us (and to photograph just for you). Though I can't say that either my husband or I were fans of green bean casserole in general, we're now fans of this one.

I've veganized the recipe and taken out some of the butter/margarine, but there's still Earth Balance margarine in the topping and some fat in the soy creamer. And oh, those fried onions! (Which I accidentally used a whole can of, instead of the half can the recipe called for.) What can I say? You could try it completely fat-free, but for a special occasion, this isn't too huge an amount of fat. And the taste is amazing. No one will know it's vegan!

And, in case this is my last post before the holidays, happy Thanksgiving to those of you who celebrate it. Thanks to Alanna for the recipe, and thanks to all of you readers for your support this year. Your comments and input make blogging fun!

Best Vegan Green Bean Casserole

Vegan Green Bean Casserole

Beans
2 quarts water
1 tablespoon table salt (Alanna says it's essential)
1 1/2 pounds fresh green beans, trimmed and cut into bite-size pieces

Bring the water to boil in a large pot. While it's heating, cut up the beans. Add the salt and beans to the boiling water. Cover and cook for 6 minutes. Drain beans in a colander, and then spray for a minute with cold water to stop the cooking. Let them drain in the colander, shaking every now and then to get off all the water.

Sauce

10 ounces mushrooms (I used a combination of regular button mushrooms and shiitake)
3 cloves garlic, minced
generous pinch cayenne pepper (had to add it for the New Orleanians)
Salt to taste
Fresh pepper to taste
2 tablespoons flour
3/4 cup vegetable broth (I used Imagine's No-Chicken)
1 tablespoon dry sherry (Alanna's brilliant addition)
3/4 cup soy creamer (or try full-fat unsweetened soymilk)

Trim and discard the mushroom stems and chop the mushrooms into pieces. Spray a non-stick pan with canola oil and heat it. Add the mushrooms, garlic, cayenne, salt, and pepper. Cook until mushrooms are very soft and exude their juices. Whisk the flour into the vegetable broth and add to the mushrooms along with the sherry. Simmer, stirring, until mixture thickens. Add the soy creamer and simmer until thick, about 5 to 10 minutes. Adjust the seasonings and stir in the beans.

Topping

1 1/2 slices whole grain bread
1 tablespoon Earth Balance margarine (the best tasting margarine in the world and no trans-fat)
1/8 teaspoon salt
1/16 teaspoon freshly ground black pepper
1 3-ounce can of French fried onions

Put the bread, margarine, salt, and pepper into a food processor and pulse until crumbly. Pour into a bowl and add the onions. Stir to combine.

To assemble:

Put the green beans into an oiled casserole dish and top with the onion mixture. Bake at 425 F for about 15 minutes. If you are not serving this right away, refrigerate the topping separately; bring to room temperature before sprinkling the topping on the casserole and baking for about 20 minutes or until hot throughout.

If you're looking for more holiday recipes, don't forget to check the end of this post!

Tags:

Labels: ,

Bookmark and Share AddThis Feed Button


Tuesday, November 21, 2006

My Family's Cranberry Relish Recipe

Brown Family Cranberry Relish 
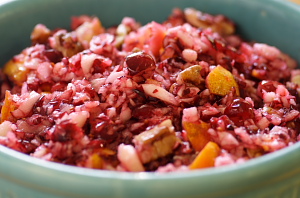
I emailed my mother to get her cranberry relish recipe, the one my husband and I descend on like a pair of hungry fruit bats each year. She emailed me the recipe, but what she sent didn't quite match my memory of the dish because I thought it had apples in it. By the time I got the recipe, she and my dad were on the road to Texas, to visit my sister. And though my parents finally broke down and bought a pre-paid cell phone, they rarely turn it on, so I was stuck.

I decided to make it with the apples, just because I couldn't see what it would hurt. My mom said to prepare this a couple of days ahead of time because it gets better over time, so I made it this afternoon. Wow! I don't know if we'll be able to keep our hands off of it until Thursday. I suppose that relish was traditionally meant to complement the turkey (or add flavor to it if you ask me, not a turkey lover even in my omnivore days). But to me it makes a great side dish. Or even a dessert. I can just imagine it over some vanilla soy ice cream. Mmmm. Stop me before I descend on the fridge!

Brown Family Cranberry Relish

Probably the Brown Family's Cranberry Relish Recipe

12 ounces fresh cranberries
1 navel orange, scrubbed and cut into 8 pieces
2 apples, peeled and cut into 8 pieces
1/4 to 1 cup natural sugar
1/3 cup chopped pecans

Wash the cranberries and remove any stems, bad cranberries, or inedible stuff you find. Put half of the cranberries, orange (unpeeled), and apple into the food processor and pulse to chop coarsely. Some larger pieces are okay, but nothing big enough to choke on. Pour into a bowl and process the other half of the fruit. Put it into a bowl, add the sugar to taste, and mix in the pecans. Refrigerate it for a day or two to allow the flavors to develop. Quick! If you start now, it'll be ready by Thanksgiving.

[Speaking of which--if you're looking for more vegan Thanksgiving recipes, scroll down, or click here.]

Tags:

Labels: ,

Bookmark and Share AddThis Feed Button


Monday, November 20, 2006

Ethiopian-Inspired Red Lentil Soup

[Looking for vegan Thanksgiving ideas? Scroll down or click here!]

Ethiopian-Inspired Lentil Soup I've been busy lately, working on several projects at once and preparing for the holidays, and I haven't had much time to develop new recipes. So this weekend I decided to adapt an old favorite, Berberé Stew, and turn it into a lentil and vegetable soup. I'm a big fan of "meal in a bowl" type dishes that cover all the bases—vegetable, starch, and protein all-in-one—and this one fits the bill. It's also quick, another plus in these hurried times.

This is a very complex and exotic tasting soup that gets its distinctive flavor from an equal amount of 11 different spices so that no one flavor predominates. I keep a jar full of the spice mixture, but if you don't want to mix up a big batch, just start with 1/8 teaspoon of whichever of the spices you have and add more to taste. Try to keep the measurements equal, though, so that the flavors balance out.

Ethiopian-Inspired Lentil Soup

Ethiopian-Inspired Red Lentil Soup

1 large onion, chopped
1 pound potatoes, cut into 1/2-inch chunks
1 + 1/4 cup red lentils (picked over and rinsed)
3 cups water
2 garlic cloves, chopped
2-3 tablespoons berberé spice mixture, below
1 28-ounce can crushed tomatoes
1 pound green beans, fresh or frozen, cut into bite-sized pieces
1-2 cups water
salt to taste
3-4 cups fresh spinach

Berberé Spice Mixture (mix all together and store in jar):

1 Tbs. ground cardamom
1 Tbs. ground coriander
1 Tbs. fenugreek
1 Tbs. ground nutmeg
1 Tbs. ground cloves
1 Tbs. ground allspice
1 Tbs. cinnamon
1 Tbs. paprika
1 Tbs. turmeric
1 tsp. cayenne (use more to taste)
1 Tbs. ground black pepper
1 Tbs. ground sea salt (optional)

Sauté the onion in a non-stick pan until it starts to brown. Add the potatoes, lentils, 3 cups water, garlic, and spice mixture. Simmer, covered, over low heat until lentils are tender, about 20 minutes. Add the tomatoes, green beans, and enough additional water to create a thick soup. Check the seasoning, adding salt and more of the spice mixture if needed, and cook for about 15 more minutes. Just before serving, stir in the spinach. Serve immediately. Makes 6-8 servings.

Tags:

Labels: ,

Bookmark and Share AddThis Feed Button


Friday, November 17, 2006

Persimmons and Frozen Persimmon Sorbet

[Looking for vegan Thanksgiving ideas? Scroll down or click here!]


I've been eating persimmons my whole life, but I never bought one until a couple of weeks ago. I grew up in southeast Louisiana, where my father, a horticulture professor at a research branch of LSU, kept (and still keeps) a garden full of interesting fruit trees. All throughout the year we'd enjoy the various fruits of his labor—tangerines, oranges, blueberries, lemons, figs, peaches, and pears— plus a few fruits none of my friends had ever heard of such as kumquats, calamondins, satsumas, and persimmons. As a child I believed that the unusual ones were monster fruits that my father had actually invented! But then I started seeing kumquats in stores, and I realized that my father was just about 20 years ahead of everyone else.

It went against my nature to buy persimmons when I know that there are perfectly good ones hanging like Christmas ornaments on my father's trees, but since those persimmons are a two hour drive away, I decided to try the store-bought persimmons. And boy am I glad I did! These persimmons have something my father's don't. Or, rather, they don't have something my father's do—seeds. The persimmons I grew up eating had several seeds per fruit, so imagine my surprise when I cut open one of the store-bought persimmons and found no seeds:


Let me tell you, this is a big improvement! When you're all set to eat a very ripe, juicy persimmon, the last thing you want is a bunch of seeds getting in the way.

I also found that there are two different types of persimmons being sold in my area. The ones in the two photos above are called Hachiya, and they have to be very soft before you eat them or they'll have what they call an "astringent" quality, meaning they'll make your mouth all puckery. They're similar to the ones my dad grows, but without seeds. If you let them get so soft that you're afraid they've gone bad, then they'll taste so sweet and juicy that you'll be scraping the skin with your teeth to get off all the fruit.

In an Asian grocery store, I found another variety of persimmon that I had never tasted. It was 
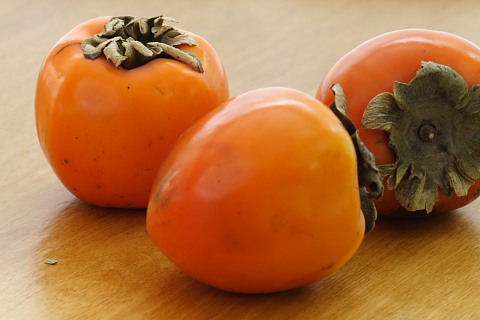
labeled "Japanese persimmon," and from what I've read, they're also called Fuyu. While the Hachiya is sort of acorn-shaped and often has a pointy bottom, the Fuyu is squatty, shaped more like a flattened apple. The wonderful thing about the Fuyu is that it is not astringent at all, and you can eat it while it is still hard and it will be sweet. I couldn't believe how delicious the Fuyu I bought was and was sorry I'd only bought the one that you see in the photo on the left. I'll definitely be going back to the market soon to get a whole bag of them.

I like to eat persimmons just as they are and have never felt the need to cook with them. (From what I've read, the Hachiyas are the ones you can cook with, but I really don't see why Fuyus couldn't be cooked, also.) It's possible to make puddings, pies, cookies, and cakes with persimmons, so I went searching for an easy persimmon recipe that didn't use a lot of sugar or flour, and I found the mother of all simple recipes—Frozen Persimmon Sorbet:


See what I mean? It doesn't get much simpler than that. You just put the persimmon (washed, of course) into the freezer for about 2 hours, until it's slushy but not frozen solid, take it out, cut off the top, and dig in with a spoon. A cool, delicious treat!

One caveat: I had high hopes that this would be a simple yet elegant dessert for serving guests, sort of like lemon sorbet served in lemon halves. Well, it was simple but not, I'm afraid, elegant. Persimmons have a tendency to collapse after you've taken a few spoonfuls from their centers, so if you want to get more than a couple of bites, you have to find some way to scrape the flesh off the inside, and there's just no way to do that without getting your hands dirty. I've tried. It's best to save the frozen persimmons for a cozy dinner with someone you love. Someone who doesn't mind seeing you pick up a persimmon skin and scrape it clean with your teeth.

Tags:

Labels: ,

Bookmark and Share AddThis Feed Button


Tuesday, November 14, 2006

Tofu Stuffed with Brown Rice and Mushroom Dressing


Thanksgiving came early to our house this year. Though we'll be visiting my in-laws for the main big feast, I decided to have a little celebration just for my own little family. After all, we have a lot to be thankful for. Besides, I wanted to try my hand at something that couldn't easily survive a long car trip, something that, frankly, might be a little too "weird" for my in-laws. After all, one of my unwritten rules is to never serve undisguised tofu to non-vegetarians. Tofu in sauces, desserts, and lasagna is fine, but I try to avoid serving anything that might freak out the tofuphobes. So this little dish was just for us tofuphiles!

I love baked tofu, but it's not the most festive-looking dish, so I decided to fancy it up a bit and fill it with stuffing. I opted for a brown rice stuffing because I recently made a resolution to avoid refined starches, and I'm not ready to break it, even for Thanksgiving. I used the same seasonings I'd use in my cornbread dressing and made a no-oil gravy to pour over everything. With some steamed broccoli and some mashed potatoes, this was a feast for three people—but we ate every bite! [My mother's cornbread dressing is a "pinch of this, pinch of that" dish with no recipe, but check the end of this post for links to my other favorite holiday recipes.]


Tofu Stuffed with Brown Rice and Mushroom Dressing
(click for printer-friendly version)

The Tofu

1 pound extra firm tofu (hard Asian tofu is best)
1 cup vegetable broth (I used No-Chicken broth by Imagine Foods)

1/4 tsp. sesame oil
1 1/2 tbsp. soy sauce
1 tsp. minced garlic
1/4 tsp. poultry seasoning (or blend of ground thyme and sage)

Cut the tofu in half through the middle (hard tofu will already be cut).


Then cut each of the halves in triangles by cutting down through the top on the diagonal. (Yes, my favorite knife is purple.)


Turn the triangles cut-side down, and cut in half to form eight equal triangles.


Using a slender knife, carefully cut around the edges of the long side of each triangle, about 1/4 inch away from the edge. Be sure to hold the knife at the same angle as the edge of the tofu to avoid cutting through the outside of the tofu. Make your cuts as deep as you can without risking cutting through the outside wall.


Making additional cuts in a grid pattern helps in getting the tofu out.


Use a spoon (a grapefruit spoon works great here) to remove the tofu from the middle of each triangle. Go as deep as you can, being careful to keep the pouch intact. Set aside the tofu that you take out of the middle--you can use it in the gravy.


Put the tofu pouches in a shallow pan that will hold all of them on their sides. Mix the broth with the remaining ingredients and pour it over the tofu, making sure that some goes into the pouches.


Marinate for at least 30 minutes; then carefully turn the tofu over and marinate the other side for 30 minutes or more. When the rice is done, proceed with stuffing.


Brown Rice and Mushroom Dressing

1 large onion, chopped
1 rib celery, chopped
2 tsp. garlic, minced
6 ounces mushrooms, chopped
1 1/2 tsp. thyme
1/2 tsp. rubbed sage
1/2 tsp. rosemary
1/8 tsp. black pepper
1 cup long-grain brown rice
2 1/2 cups water
1 tsp. salt (optional)
1/3 cup chopped fresh parsley

Spray a large, non-stick pot with canola oil and set it on medium-high heat. Add the onions and celery, and cook until the onions start to become translucent, about 3 minutes. Add the garlic, mushrooms, herbs, and rice and sauté for another minute. Add the water and salt and cover tightly. Turn the heat very low and cook for about 45 minutes, or until rice is tender and water is mostly absorbed. Resist opening the lid until 45 minutes have passed!

Stuffing the Tofu

Preheat the oven to 400 F. Drain the marinade from the tofu and reserve it. Add the parsley and 1/4 cup of the marinade to the rice and stir. Spray two medium-sized baking dishes with non-stick spray. Using a small spoon, gently stuff each piece of tofu with as much rice as you can fit in. Stand the stuffed tofu in one of the two baking dishes. Put the remaining rice dressing in the other dish. Put both dishes into the oven and bake until the tofu is becoming light brown, about 35 minutes. Watch closely to make sure it doesn't burn on the bottom. Serve atop additional rice dressing with gravy (recipe below), if desired. Serves 4.


Tofu-Mushroom Gravy

This can be made without the tofu or mushrooms, if you choose.

1 small onion, minced
extra tofu from making Stuffed Tofu
1 clove garlic, minced
5 mushrooms, sliced
1/4 cup unbleached white flour (or gluten-free flour of choice)
tofu marinade
about 1 1/4 cups vegetable broth
1/2 cup plain soymilk
1 tsp. poultry seasoning
1 tsp. thyme
1 tbsp. nutritional yeast
1/8 tsp. Liquid Smoke seasoning
salt and pepper, to taste

Add enough vegetable broth to the reserved marinade to make 2 cups of liquid.

Spray a non-stick sauce pan with canola oil. Add the onion and sauté for about 3 minutes. Add the tofu and garlic, and cook, stirring, for 1 minute. Add the mushrooms and cook until they exude their juices. Stir in the flour and cook for about 3 minutes, stirring constantly. Slowly stir in the vegetable broth mixture. Add the remaining ingredients and cook, stirring, until mixture thickens, about 5 to 10 minutes.

I usually keep Thanksgiving dishes fairly simple; because we travel, anything I make has to be easy to transport without danger of being ruined. Besides, most of our favorite dishes are side dishes that require no recipe: mashed potatoes, green beans with "bacon," fresh cranberry sauce, and roasted sweet potatoes. The one year that my family came here for the holiday, I made a Vegan Nut Roast that everyone liked, but I warn you, it's not low in fat.

Below is a list of some of my favorite winter holiday recipes. For other people's favorites, check out the Holiday Dishes at Fatfree Vegan Recipes, Bryanna Clark Grogan's Vegan Holiday Feast Recipes, and Nava Atlas's Vegetarian Thanksgiving. For gluten-free recipes with vegetarian options, see Karina's Gluten-Free Holiday Tips, and for everything you ever wanted to know about vegetables, take a look at Alanna's Thanksgiving Vegetable Collection as well as her links to vegetarian holiday recipes. Or do a Veg Blog Search. Many Canadian bloggers have already posted about their Thanksgiving celebrations, so you may be able to find inspiration there. Also, take a look at this amazing stuffed pumpkin. There are so many great vegetarian ideas out there!

Main Dishes:

Soups:

Sides:

Desserts:

Tags:

Labels: , , ,

Bookmark and Share AddThis Feed Button


Sunday, November 12, 2006

Cherry Soy Yogurt Smoothie

Given the chilly weather here, I should probably be writing about hot drinks, but instead, I'm thinking of breakfasts. A non-vegetarian friend of mine recently asked me what E. has for breakfast on school days. It seems my friend's daughter has the same problem that E. does—she's not hungry for breakfast at 6:00 in the morning, but if she doesn't eat, she's not at her best for the rest of the morning. I'm not sure that I was much help. The list of foods that E. will tolerate in the early morning is short: soy yogurt, fresh fruit (Asian pears are her current fave), leftover pasta, and on very rare occasions oatmeal.

One thing she does like is the Silk Live Soy Smoothie drinks, but even on sale, they're pretty expensive—and full of sugar. So I've been making a version of them at home, using a little soy yogurt for that cultured taste (and the benefits of live cultures) blended with different types of frozen fruit. So far, we've mostly had these at night as dessert, but I'm going to start making them for breakfast more often.

This cherry-banana blend is particularly good. The banana gives it added creaminess so that I don't have to use as much soy yogurt, but it doesn't impart a lot of banana flavor.


Cherry Soy Yogurt Smoothie

1/2 cup plain soy yogurt
1/2 cup vanilla soy milk
1 banana
sweetener to taste (optional)
1 cup frozen sweet black cherries
1/2 teaspoon lemon juice

Put the yogurt, soy milk, banana, and sweetener (if using) into the blender, and process until liquified. Add the cherries and the lemon juice and blend until smooth and creamy. Makes one large or 2 regular sized servings. (Pictured is one large serving.)

Do you have kids with little appetite in the morning? How do you entice them to eat?

Tags:

Labels: ,

Bookmark and Share AddThis Feed Button


Thursday, November 09, 2006

Patatas Bravas

Spanish Potatoes

I was looking through a copy of one of those photo-filled, generic cookbooks that's put out by magazines like Family Circle, and a recipe for Patatas Bravas caught my eye because it sounded good and I had all the ingredients at hand. All I had to do was swap the fried potatoes with baked ones--eliminating a lot of olive oil and fat grams--and tweak the sauce a little, and I had a delicious but healthy tapas or side dish.

The "Bravas" of the title apparently translates to "fierce," meaning fiery or hot, but if you expect to be breathing fire after eating this version, I'm afraid you'll be disappointed. The cayenne gives it a little bite, but the predominant flavor is delivered by the smoky paprika. If you want to give it a little more fire, you'll need to add more cayenne to taste. Whether you make them tame or fierce, you'll be hearing a lot of "bravas" when you serve these scrumptious potatoes. (Sorry, I just couldn't resist!)

Spanish Potatoes

Patatas Bravas
(Crisp Spanish Potatoes with Spicy Tomato Sauce)

(click for printer-friendly version)

3 pounds red potatoes, scrubbed well and cut into 1/2-inch cubes (I didn't peel mine)
olive oil spray
1/2 medium red onion, minced
2-3 cloves garlic, minced
1 tablespoon smoked Spanish paprika
1/4 teaspoon cayenne pepper
1 15-ounce can diced tomatoes
1 bay leaf
1/2 cup water
4 -6 green olives, halved
chopped parsley, for garnish

Start a large pot of water on to boil while you preheat the oven to 375 F. When the water comes to a boil, add the diced potatoes. Boil for 5 minutes—no longer or they will start to fall apart. Pour them gently into a colander and allow all the water to drain off.

Place the potatoes into a large, shallow baking dish that has been sprayed with olive oil. Spritz the tops of the potatoes lightly with olive oil and place in the oven. Bake for 15 minutes and then stir with a spatula, making sure they aren't sticking to the pan. Bake for about 30 more minutes, stirring again halfway through. The potatoes should become crispy but not hard and overdone.

While the potatoes are cooking, make the sauce. Sauté the onion in a non-stick pot for about 3 minutes. Add the garlic, paprika, and cayenne and cook one minute more. Add the remaining ingredients (except parsley) and simmer for about 20 minutes, until thickened. Remove the bay leaf and puree the sauce in a blender or food processor. Return it to the pan and keep warm until ready to serve.

Once the potatoes are cooked, place them in a serving bowl and pour the sauce over the top. Sprinkle with parsley and serve as a side dish or appetizer.

Makes 6 servings. Per serving: 211 Calories (kcal); 1 g Total Fat; (5% calories from fat); 6 g Protein; 46 g Carbohydrate; 0 mg Cholesterol; 146 mg Sodium; 5 g Fiber

Looking for Thanksgiving recipes? Nava Atlas has compiled 40 of her favorite recipes into a PDF file that you can easily download onto your computer. It costs just $8, and a generous portion of that goes to Share Our Strength, an organization that's working to end childhood hunger.

You can see the table of contents and order the e-book from this page. I already have my eye on the Traditional Potato-Bread Stuffing, which uses much less bread than most stuffing recipes, and just the mention of Cranberry-Apple Relish puts me in the holiday mood.

Tags:

Labels:

Bookmark and Share AddThis Feed Button


Tuesday, November 07, 2006

Southwestern Chayote Casserole

I'd been planning for days to make a vegan version of one of the mirliton casserole recipes on the internet. I'd even cooked the mirliton in advance so that the casserole would be that much quicker to make. But then lack of celery spoiled the whole plan.

Mirliton? Celery? Wondering what the heck I'm talking about?

Mirliton=Chayote=Chouchou=a squash-like vegetable with many names. In Louisiana we call them mirlitons (pronounced mee-li-tawns, in parts of the state) and eat them stuffed and in casseroles. I've written about them a few times before, with Mirliton and White Bean Stew being one of my favorite recipes on this blog. Many U.S. supermarkets now sell them as chayotes, so before you write them off as some exotic ingredient that you won't be able to get, look for the light-green, pear-shaped vegetables near the ginger root and bean sprouts in your local grocery store.

Now, about that casserole. As you know celery is part of the "trinity" of ingredients that's considered essential in most of Louisiana cooking. When I realized I didn't have any, I just couldn't bring myself to make a mirliton casserole without it. After all, I was already planning to leave out the seafood, ham, butter, bread crumbs, and cornflakes of the traditional version; without celery, I just didn't think it'd be a Louisiana recipe at all! So I made a sudden turn and decided to go a little more southwest with the recipe: instead of seafood—beans; instead of bread crumbs and cornflakes—cornbread. The results were completely different from the mirliton casserole I had envisioned, but very, very good.


Southwestern Chayote Casserole
(click for printer-friendly version)

3 chayote squash
1 large onion, chopped
1 bell pepper, chopped
1 small jalapeño pepper, seeded and diced
2 cloves garlic, minced
2 teaspoons chili powder
1 teaspoon smoked Spanish paprika
1 teaspoon cumin
chipotle chile powder, to taste (I used about 1/8 tsp. to keep this casserole mild)
1 15-ounce can diced tomatoes
1 1/2 cups cooked pinto or other beans (I used a mixture of different chili beans)
1/2 cup TVP (textured vegetable protein) granules*
3/4 cup vegetable broth*
salt to taste

Cornbread topping:

1 cup cornmeal
1 tablespoon agave nectar
1 tablespoon nutritional yeast
1/2 teaspoon salt
1 cup boiling water

Cook the chayotes in boiling water until they are soft enough that they can be pierced to the middle with a fork. Set aside to cool (you may continue on with the recipe and come back to the chayotes later). When they are cool enough to handle, cut them in half from top to bottom, remove the seed from the center, and eat it. (Seriously, the seeds are tasty, but throw them away if you don't like them.) If the skin of your chayote is tough or bitter, as some varieties are, peel it; then cut into 1/2-inch pieces.

Sauté the onions in a large non-stick pan until they begin to brown. Add the bell pepper, jalapeño, and garlic and cook for 2 more minutes. Add all remaining ingredients, including the cubed chayote but excluding the topping; cover and simmer for 15 minutes.

Preheat the oven to 400 F and oil a large casserole dish. Transfer the chayote mixture to the casserole dish. Prepare the cornmeal topping by mixing the dry ingredients and stirring in the boiling water until smooth. Drop it by spoonfuls over the casserole, and then smooth it evenly over the top. Bake until the topping is firm and beginning to get crisp, about 25-30 minutes. Makes about 6 servings.

*Note: Instead of TVP, you may substitute 1 cup of corn or additional cooked beans for the TVP and vegetable broth.

Tags:

Labels:

Bookmark and Share AddThis Feed Button


Monday, November 06, 2006

New Search Engine for Veg Blogs

I've just added a new feature to my Blogs List that should be a big help for those of us who read a lot of vegetarian or vegan blogs. It's a Google Custom Search Engine designed to search only veg(etari)an blogs. So, if you want to find a recipe that you noticed sometime last spring for The Best Vegan Chocolate Chip Cookies Ever, or you can't quite remember the name of the blog that brings us Friday Cow Blogging along with astute political commentary, Veg Blog Search makes it easy. You can even add the search engine to your personalized Google homepage, if you have one, just by clicking on the button: Add to Google

There are a few limitations. It won't catch very recent posts because it takes a week or two for Google to update its index, it's weighted heavily in favor of blogs with high PageRank, and the most recent posts are not listed first, like I'd like. But I think you'll find it more useful than Google's blog search if you read mostly vegetarian blogs. (To search food blogs in general, check out Elise's very thorough search engine at FoodBlogSearch.com, and to search for recipes in magazines, take a look at Alanna's Food Magazine Search.)

Give it a try and see what you think. All of the vegetarian blogs on my bloglist have been added, plus any others that I've tracked down. If you're a vegetarian or vegan with a blog, search for your blog's name to see if it's included (enclosing it in quotes helps), and if it's not, send me your URL in a comment below or email it to me at blog [at] fatfreevegan [dot] com and I'll get it added. To be included, your blog should deal at least in part with some aspect of vegetarianism, even if it's just a post every now and then. My apologies to those of you with almost-vegetarian blogs, but I'm working hard to keep the search engine strictly focused on vegetarian blogs: i.e. no posts about fish or chicken.

I hope you find this search engine as useful as I have. Happy blogging!

Tags:

Bookmark and Share AddThis Feed Button


Friday, November 03, 2006

Purple Pesto Soup

When I went out to walk the dog this morning, I noticed that our basil plants were not too happy about our overnight cold snap. The purple opal ones were particularly droopy, and since the weather's only going to get colder, I knew I needed to use them soon. I'd already frozen as much basil as my fridge could hold back in the summer, so I started thinking of warm, winter dishes that I could use a whole bunch of basil in. I'd made a wonderful Provençal Bean and Vegetable Soup with Pesto back in April, but I was hoping to make something a lot simpler than that, something I could whip up quickly for lunch. Something creamy.

And this potentially addictive soup is what I came up with. It's warm and creamy but somehow tastes like summer. And it's purple! Who could ask for more on a chilly day in November?


Purple Pesto Soup

Obviously, it's purple because of the variety of basil I used, but it would be just as delicious with regular basil.

1 medium onion, chopped
3 cloves garlic, minced
4 cups hot water
1 head cauliflower, cut into florets
1 1/2 cups (or 1 15-ounce can) great northern beans, rinsed and drained
1 cup purple basil leaves, firmly packed (or use green)
1 tablespoon cashew butter (or try almond butter or tahini) *
white pepper, to taste
salt, to taste
additional garlic, to taste

Sauté the onion in a non-stick pan until translucent, about 3 minutes. Add the garlic and sauté for one minute more. Add the hot water and cauliflower, reduce heat, and cover. Cook until the cauliflower is completely tender, about 10-15 minutes.

Add the beans and cook for another 5 minutes. Add the basil and cashew butter. Use a hand blender to puree the soup until it is completely smooth. (Alternately, put the soup in batches into a regular blender and blend smooth; return soup to the pot.) Add white pepper and salt to taste and add additional garlic if desired.

Makes 4 servings. Per serving: 154 Calories (kcal); 3 g Total Fat; (14% calories from fat); 10 g Protein; 26 g Carbohydrate; 0 mg Cholesterol; 54 mg Sodium; 9 g Fiber

*Note: The cashew butter contributes a lot to the creaminess and the flavor, but leave it out if you prefer your soup to be lower in fat.

Tags:

Labels: ,

Bookmark and Share AddThis Feed Button


Wednesday, November 01, 2006

Pumpkin and Roasted Corn Soup

Here in Mississippi, you never know what the weather is going to be like on Halloween. Plan on having a hot bowl of soup for dinner and you'll be disappointed when the temperature climbs into the 80's. Last night was like that. Although it was a lovely night and the kids were very comfortable in their light weight, short sleeved costumes, we adults, trudging along behind them from house to house, were decidedly warm.

All devils say Trowf auf Delectat!But it was a good time. Our tradition is to trick or treat with our neighbors, who have three kids, one of whom is taking 7th grade Latin. She suggested that instead of shouting "Trick or Treat" at each house they chant the Latin translation. Now, I have no idea what the real translation for "trick or treat" is, but what they shouted came out sounding like "Trowf auf Delectat." So this group of kids dressed as devils, vampires, and witches proceeded to go up to houses chanting "Trowf auf Delectat" without explaining the meaning to the people at the doors. The stunned homeowners probably thought they were the children of some cult, chanting praises to Satan. At least, we parents amused ourselves with that thought, and pretty soon we were chanting "Trowf auf Delectat" too. Big fun.

We came home to a pot of nice, hot soup--but first we had to turn on the air conditioning! I made up for the heat of the soup by pairing it with a crisp, green salad, and it turned out to be a delicious meal. The soup is a little hard to describe: creamy and rich-tasting, it has a very light curry flavor but picks up some spiciness from the chipotle chili pepper. It wasn't so spicy that E. couldn't eat it, though she did drink a couple of glasses of water with dinner.

I have to confess that I made this with the last of my hubbard squash, but I'm just going to be stubborn and call it pumpkin soup. You can use any type of winter squash you like; since it's not a sweet soup, the sweetness of the squash doesn't make a difference.

Pumpkin and Roasted Corn Soup

Pumpkin and Roasted Corn Soup
(click for printer-friendly version)

1 large onion, chopped
3 cloves garlic, minced
1 1/2 teaspoons grated fresh ginger
1 teaspoon chopped chipotle pepper (canned in adobo)
5 cups pumpkin or winter squash, peeled and cut into 1-inch cubes
5 cups vegetable broth or water
1/2 teaspoon good curry powder
3/4 cup plain, unsweetened soymilk
3 cups fresh or frozen corn kernels
olive oil spray
freshly ground pepper
salt (optional)

Sauté the onion in a large, non-stick pot until browned, about 6 minutes. Add the garlic and ginger and cook for 1 more minute. Add the chipotle, pumpkin and water. Reduce heat to medium-low and cook until pumpkin is completely tender, about 30 minutes. Add more broth or water as needed to maintain about the same level of liquid.

When the pumpkin is tender, add the curry powder and soymilk. Using a hand blender, puree in batches until smooth, or transfer to a blender and blend in batches. Add salt and additional curry powder to taste, add more liquid if it's too thick, and keep it warm while you prepare the corn.

Place the corn kernels in a large, shallow baking dish that has been sprayed with olive oil. Sprinkle with a little freshly ground pepper, and spray the top of the corn lightly with olive oil. Place in the oven under the broiler and broil, stirring often, until the corn begins to brown. Watch carefully! This should only take a few minutes--a little longer for frozen corn than fresh. Be sure not to overcook or the corn will get rubbery.

Divide the corn and soup into 4 servings and serve the soup with the roasted corn sprinkled on top.

Makes 4 servings. Per serving: 170 Calories (kcal); 1g Total Fat; (3% calories from fat); 6g Protein; 41g Carbohydrate; 0mg Cholesterol; 25mg Sodium; 4g Fiber


That hubbard squash got quite a workout, by the way. I used it in Impossible Vegan Pumpkin Pie, Pumpkin Pie Wontons (similar to these), and Cambodian Vegetarian Stew. Just a few large winter squash really could get a family through the winter!

Tags:

Labels: ,

Bookmark and Share AddThis Feed Button