Welcome to My Kitchen!

SusanV I'm SusanV, and I love good food. Join me as I create delicious dishes made with whole foods and without a lot of processed fat and sugar. Want to know more? Check out my FAQs, look through my recipe index, or get inside info on Facebook. Like what you see? Then subscribe to receive email updates. But above all, enjoy!


Latest Recipe


On FatFree Vegan Today

On FatFree Vegan Today


Current Faves


Sweet Potato Falafel

Skillet Gardener's Pie

Easy Mac and Cheeze
Easy Mac and Cheeze

Vegan Corned Beef and Cabbage

Colcannon Puffs
Colcannon Puffs


 Subscribe to comments


Recipe Index


Previous Posts


Archives


Posts by Topic

Cats | CORE* | Crock-Pot | Dogs | Eat to Live | E Cooks | Events | Flowers | Gardening | Gluten-Free* | Higher-Fat* | Holidays | Life | Louisiana | Nature | Pasta | Pressure Cooker | Ridiculously Easy | Southern Cooking | Soy | Travel  | Vita-Mix

*CORE designation is an approximation; this site has no affiliation with Weight Watchers International. Higher-fat recipes derive more than 15% calories from fat. Recipes marked gluten-free depend on use of specially-labeled gluten-free ingredients.

Search for Recipes:

Search Over 600 Vegetarian and Vegan Blogs:


Saturday, June 30, 2007

The Very Hungry...Hornworm?

Tomato Hornworm

Subtitle: What's Eating Susan's Tomatoes

If you grow tomatoes, chances are you've had to deal with these pesky creatures. The tomato or tobacco hornworm starts life as tiny larva, but very quickly it can grow to 4 inches long and as thick as your index finger as it munches through your garden. One hornworm can defoliate an entire tomato plant if it isn't stopped in time. The one you see here ate the top third of a 6-foot tall tomato plant overnight. That happened despite the fact that I check carefully 2 or 3 times a day; they cling to the undersides of leaves and their coloring makes them very hard to spot. You have to carefully track them by following the trail of eaten leaves and excrement that they leave behind.

Tomato Hornworm

Here's a close up of this fellow continuing in his quest to eat my entire garden. They will eat right through the green tomatoes, too.

I bring this up because I have a question for all the vegan gardeners out there: What do you do about garden pests such as the hornworm?

Do you...

A. Pick them off and kill them?
B. Spray the plants with an organic pesticide like Bt, which ultimately kills them?
C. Drive them across town and release them in a vacant lot?
D. Put them in a tank, hand feed them tomato leaves until they grow to an enormous size and then release them across town in a vacant lot?

I have to admit to doing all of the above at one time or another. The only other option that I can think of would be to E. Allow them to eat all the tomato plants, which given the time and resources I've put into my garden, I just can't do. So, what do others of you, who feel compassion for all living creatures, do when faced with a creature that just wants to eat your garden?

By the way, the creature above, whom E. named "Mr. Tingle" for some reason, was released in the empty field opposite our community swimming pool. That made E. very happy...and also, I suspect, some passing bird a very nice meal.

Domino defending the garden

Here's Domino defending the garden from hornworms!

Coming tomorrow: What to cook for the Fourth of July.

Tags:

Labels: , ,

Bookmark and Share AddThis Feed Button


Monday, June 25, 2007

Nasu Dengaku (Japanese Eggplants Broiled with Miso)

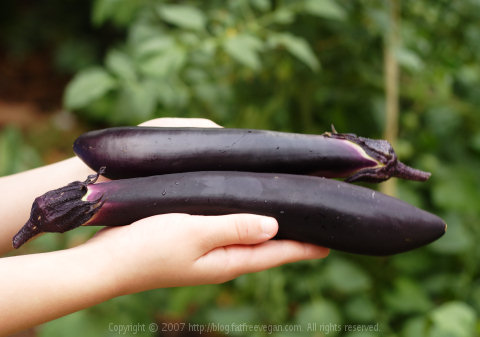
Homegrown Japanese Eggplants
E. holding this summer's first eggplants

Over the weekend, we harvested the first of our Japanese eggplants, and I knew immediately what I wanted to do with them. Our favorite sushi restaurant used to have this eggplant appetizer that I loved until they slowly stopped serving it. I say "slowly" because at first it was unavailable every now and then, when the eggplants weren't in season; then it was unavailable most of the time; finally, it disappeared from the menu altogether, and I was left craving this eggplant dish that I couldn't get anywhere else.

What is it? It's actually a very simple dish, a fact I found out after several more elaborate cooking attempts that never came out quite right. Japanese eggplants are broiled (or grilled, if you have the time), spread with a sweetened miso mixture, and then broiled again for a few seconds. The results are creamy, smoky eggplant with a sweet and salty sauce that will make you scream out "Yes Yes Yes!" But fortunately, you can keep from embarrassing yourself in public if you make it at home. (Oh, if only I'd known that sooner!)

You'll notice that my recipe contains agave nectar, which is hardly a traditional Japanese ingredient. You can choose to substitute sugar, or you can try another natural sweetener, but you may need a little more because agave is sweeter than sugar and much sweeter than, for example, rice syrup or barley malt syrup. Stay away from maple syrup or any sweetener that's strongly flavored, though; the sweetener's just there to sweeten, not to deliver any flavor.

Eggplants Broiled with Miso

Nasu Dengaku (Japanese Eggplants Broiled with Miso)
(click for printer-friendly version)

2 tablespoons mirin
2 tablespoons saki (may substitute dry vermouth or white wine)
4 tablespoons mellow white miso (reduced sodium, if available)
3 tablespoons agave nectar
4 Japanese eggplants, stem end trimmed and cut in half lengthwise
1/2 teaspoon sesame oil (optional)
toasted sesame seeds, for garnish
sliced green onions, for garnish

Place the mirin and saki in a small saucepan and bring to a simmer over medium heat. Simmer for about 2 minutes to allow some of the alcohol to cook off. Then add the miso and stir until smooth. Stir in the agave nectar, reduce the heat to very low, and continue to cook, stirring occasionally, while you broil the eggplants:

Brush the cut sides of the eggplants with the sesame oil, if desired. Put the eggplants cut-side down on a baking sheet and place under the broiler of your oven for about 3 minutes, checking often to make sure that they do not burn. Turn them over, and cook for another 3 minutes or until the tops are a light to medium brown. Do not burn! (If your eggplant still isn't tender all the way through, try baking it--no broiler--a few more minutes; then proceed with the recipe.)

When the eggplants are tender, top each one with the miso sauce and put them back under the broiler until the sauce bubbles up--this should take less than a minute, so watch them closely. Serve hot, sprinkled with toasted sesame seeds and green onions.

Serves 4 as an appetizer. Per serving: 152 Calories (kcal); 2g Total Fat; (11% calories from fat); 4g Protein; 31g Carbohydrate; 0mg Cholesterol; 740mg Sodium; 5g Fiber.

Some Notes about Miso:

Look for white miso (which is actually more like beige in color) at your local natural foods store or in Asian grocery stores. You will find better prices in the Asian markets, but check labels carefully because many of the brands of miso there contain fish (bonito) extracts.

Though miso has many health benefits, it is very high in sodium, a fact that should be kept in mind by anyone following a low-sodium diet (and vegans may have added reasons to be concerned about sodium). Look for low-sodium miso and use it if available.

Tags:

Labels: , ,

Bookmark and Share AddThis Feed Button


Friday, June 22, 2007

Baked Spinach Kofta with Cucumber-Yogurt Sauce

I never buy cookbooks for the pictures, but I broke that rule a few months ago after previewing Tropical Asian Cooking. It's nowhere near a vegan book, though there are several vegetarian or near-vegetarian recipes, but the photos were just so lovely that I had to have a copy. So I bought it and it sat for months by my reading chair with pieces of paper sticking out to mark potentially good recipes. But most of its dishes require more time and energy that I generally have, so none of them got made, until last night.

Spinach Kofta caught my eye because it was easily veganizable by replacing the cheese with tofu and some seasoning, and the fat could be reduced by baking instead of frying. Unfortunately, I wasn't sold on the eggplant sauce that accompanied the recipe, so after some thought, I decided to use a raita-style cucumber sauce instead.

I will not lie to you: It was a lot of work for a week night. The list of ingredients looks simple, until you realize that the potatoes and the spinach need to be cooked before the rest of the recipe is put together. But all in all, it was worth it. The kofta, crispy on the outside and tender on the inside, were mildly seasoned, and even E., who didn't want to try them at first, wound up cleaning her plate. And though they are seasoned with curry, I served them with pita bread and hummus, so consider them a cross-cultural kind of dish.

Baked Spinach Kofta

Baked Spinach Kofta
(click for printer-friendly version)

2 medium red potatoes, about 12 ounces
6 ounces fresh spinach
2 ounces firm tofu
2 teaspoons nutritional yeast flakes
2 teaspoons lemon juice
1 teaspoon salt (reduce for low-sodium diets)
1 teaspoon cumin seeds
1/2 onion, minced
2 cloves garlic, minced
1 teaspoon minced fresh ginger
1/2 teaspoon garam masala
3 tablespoons chickpea flour (besan)

Peel the potatoes, dice them into 1/2-inch pieces, place them in a saucepan, and cover them with water. Boil until the potatoes are tender and then drain them well and mash. Set aside.

Bring a large pot of water to a boil. Add the spinach and blanch for one minute, or just until wilted. Drain well in a colander. Put the spinach along with the tofu, nutritional yeast, lemon juice and salt into a food processor and process until crumbly. Set aside.

Spray a large skillet with canola oil and bring it to medium-high heat. Add the cumin seeds and toast for one minute. Add the onions, garlic, and ginger and sauté until the onions are soft, about 3 minutes. Add the garam masala, stir, and immediately add the potatoes and the spinach mixture. Cook, stirring, for 3 more minutes. Remove from the heat and spoon into a large bowl.

Add the chickpea flour and stir well. Allow to cool until easy to handle. Shape into about 20 balls, approximately 1-inch in diameter. (Don't worry about getting them perfect; they will naturally flatten out some during baking.) Place on an oiled cookie sheet or a silicone baking mat:

Spinach Kofta before Baking

Preheat oven to 450F. Bake for 10 minutes and then turn the kofta. Bake for 10 more minutes and turn again. Bake for 10 more minutes or until all sides are lightly browned.

Serve with Cucumber-Soy Yogurt sauce (below), garnished with tomatoes, red onion, and hot chile peppers. This makes a delicious stuffing for whole wheat pita bread or chapatis.

Makes 4 servings. Per serving: 116 Calories (kcal); 1g Total Fat; (9% calories from fat); 6g Protein; 22g Carbohydrate; 0mg Cholesterol; 568mg Sodium; 3g Fiber.


Baked Spinach Kofta

Cucumber-Soy Yogurt Sauce

1 small or 1/2 large cucumber
1 cup plain soy yogurt
1/4 cup diced red onion
1-2 tablespoons minced mint leaves
1-3 tablespoons lime juice (use more if you are using store-bought soy yogurt because it tends to be sweetened)
1/4 teaspoon ground coriander
1/4 teaspoon ground cumin
salt and freshly ground pepper, to taste

Peel and finely dice the cucumber. Place the pieces in a colander and allow the liquid to drain while you mix the other ingredients in a bowl.

Before adding the cucumber, blot it lightly with a paper towel to remove excess moisture. Add it to the yogurt mixture and stir to combine. Refrigerate for at least 1/2 hour to allow the flavors to blend.


The HEart of the MatterIt's been a long time since I've participated in any food blog events, and I really regret that. The truth is, I just haven't made the time to keep up with what's going on in the blogging world, but recently I came across an event that I can really get behind: The Heart of the Matter--Eating for Life, a monthly round-up of heart-friendly recipes from all over the world. Since this blog is all about eating the healthiest diet possible (except for, ahem, those doughnut muffins), I thought it was time to join in, and these Baked Spinach Kofta are just perfect--very low in calories and fat and full of spinachy nutrition. This month's theme is vegetables, so be sure to check out all the fantastic and healthy recipes once the round-up is posted.

Tags:

Labels: , , ,

Bookmark and Share AddThis Feed Button


Wednesday, June 20, 2007

Mini Doughnut Muffins

Dieters, avert your gaze.

Mini Doughnut Muffins

I shouldn't have done it. I need these muffins like I need another 10 pounds on my thighs. But in a moment of motherly guilt, I made a rash promise to E. to make "donut holes," and she was with me when I bought the mini muffin pan, so I couldn't back out. Yesterday, when she had a friend sleeping over, seemed like the perfect time to live up to my promise. After all, the girls would eat most of them. And I could control myself around the rest. Right?

Mini Doughnut Muffins with Sprinkles

Wrong! Of course I had to test them to see how the recipe tasted...and then again, to make sure. And just one more to consider what I might change. Though they're tiny, the three I ate were still too many for my conscience and my waistline. But they were delicious...tender, moist, lightly sweet, glistening with sugary glaze. I'd better stop thinking about them before I grab one of the ones reserved for E. and her friend's breakfast!

Glazed Doughnut Muffin

I made three varieties: glazed, glazed with sprinkles, and maple-glazed. I wish I'd made cinnamon sugar ones, but then I would have eaten more than three! E. liked the maple-glazed ones best, and I had to agree with her.

Mini Doughnut Muffin

I'm sorry to say that they weren't fat-free, weren't made with whole wheat (or gluten-free) flour, and weren't low in sugar. And I'm even sorrier to say that I won't be giving you the recipe today. I still have some tweaking to do, and then—it pains me to say this—I'm going to save the recipe for the cookbook. I know, I know—I feel like slapping myself as I write that! But I do promise that once I perfect the recipe, it will be as close to the taste of doughnuts as you can get in a muffin. And, of course, I'll provide a fat-free version.

If all this talk has left you with doughnut muffin cravings, there are some options open to you. This article and recipe, found via a post at Orangette, were the basis for my veganized, lower-fat goodies. But if you're looking for already veganized decadence, go immediately to Vegan YumYum's Mini Baked Donuts (some with chocolate coating!) But again, dieters avert your eyes. I swear you can gain weight just from looking at the photos!

Tags:

Labels: ,

Bookmark and Share AddThis Feed Button


Sunday, June 17, 2007

Eight-Ball Zucchini Stuffed with Rice, Basil, and Sun-dried Tomatoes

Fresh From the Farmers' Market[Whenever you see the logo to the right, courtesy of A Veggie Venture, it means I'm using local Farmers' Market ingredients.]

When I saw 8-ball zucchini at the nearby farm stand, I snatched some up immediately, even though I wasn't sure what I wanted to do with them. After all, who can resist squash the size and shape of a pool ball? Stuffing was the obvious option, because otherwise their cute shape would go to waste.

I stuff things a lot, at least when it comes to dishes that eventually wind up on this blog. After all, stuffed vegetables are cute, and when you're going to be taking photos of a dish, a stuffed baby eggplant is more attractive than an unstuffed one, though not necessarily tastier.

Stuffed 8-Ball Zucchini

When it comes to ordinary, not-on-the-blog meals, however, I'm not very fond of stuffing. For one thing, it takes a lot longer than just chopping up the vegetable and, say, roasting it or even making raw "noodles" out of it with a spiral cutter. And for another thing, my daughter E. has a inexplicable dislike of stuffed vegetables: Even when she likes the veggie in question and the ingredients of the stuffing, she will automatically hate the stuffed vegetable. So I tend not to go to the trouble too often.

But, as I said, 8-ball zucchini are just too perfectly suited for stuffing, and since E. was out of the house, I decided to fill these cuties with a simple herbed rice mixture similar to what I've used on regular zucchini. This time, however, my variegated basil is in full-force, so I let it be the star of this stuffing. Sun-dried tomatoes lend some depth, and a few Kalamata olives pack their usual punch, but the peppery-fresh taste of basil really makes these stuffed zucchini special.

Stuffed 8-Ball Zucchini

Eight-Ball Zucchini Stuffed with Rice, Basil, and Sun-dried Tomatoes

4 8-ball zucchini
3 cloves garlic
1/3 cup sun-dried tomatoes (not oil-packed)
1 1/4 cup cooked brown rice
2 tablespoons slivered almonds
1 cup basil leaves, chopped
5 Kalamata olives, pitted and chopped

Cut zucchini tops off about 3/4 inch from the top. Scoop out the insides, being careful to leave a wall about 1/4 inch thick on all sides. Steam zucchini and tops for about 8 minutes, until slightly softened.

Rehydrate the sun-dried tomatoes by soaking them in hot water until softened. Remove from water and chop. Reserve soaking water.

Chop the zucchini pulp. Spray a non-stick skillet lightly with olive oil. Over medium-high heat, sauté the garlic for about 1 minute. Add the zucchini pulp and sauté for 2 more minutes. Add the tomatoes, brown rice and almonds, and if the mixture seems dry, add a splash of the tomato liquid. Add the basil leaves, Kalamata olives, and black pepper to taste. Cook until warm, about 3 minutes.

Preheat the oven to 400 F. Using a spoon, carefully stuff the rice mixture into the zucchini, mounding slightly on top. Place in an uncovered baking dish and bake for 20 minutes. Serve hot, covered with tops if desired.

4 servings. Per serving: 150 Calories (kcal); 5g Total Fat; (25% calories from fat); 5g Protein; 24g Carbohydrate; 0mg Cholesterol; 169mg Sodium; 4g Fiber

Tags:

Labels: , ,

Bookmark and Share AddThis Feed Button


Thursday, June 14, 2007

Dal Bhaji--A Recipe Redux

Think of it as the Indian version of sloppy joes. Pav Bhaji, the wonderful street food of Mumbai, traditionally consists of a potato and vegetable curry (or bhaji) served on a bun (or pav). I've never had the pleasure of sampling Pav Bhaji in Mumbai, but I did cook up my own version last year, and it was immediately one of my favorite foods.

I got a craving for pav bhaji last week, but there was a little problem: I've been limiting my servings of starchy vegetables lately, and if I wanted to stick to my diet, I could either have the bread or the potatoes but not both. So I decided to do a little revamp of the recipe and substitute quick-cooking moong dal for the potatoes. I have to say that it was a huge success. I think I'll be making dal bhaji from now on!

I also strayed from tradition in my choice of bread. My husband and I ate this hot off the stove packed in whole wheat pita pockets for dinner. The next day, we ate the leftovers cold, scooped up with triangles of pita bread; hot or cold, it makes a great dip for pitas or crackers. Serve it at your next party and it may be the most colorful dip your guests have ever seen, with its flecks of green and orange and red vegetables. And with all those vegetables and its 14 grams of fiber per serving, it will definitely be the healthiest!

Dal Bhaji

Dal Bhaji

I used zucchini in this recipe because I didn't have any cauliflower, so feel free to substitute other vegetables for the ones listed here.

If you're not a fan of spicy food, be careful with the masala and the chili pepper. Add a little and taste; you can always add more if necessary.

1 cup moong dal or red lentils
3 cups water
1 cup each of each of these vegetables, finely diced: green beans, carrots, zucchini, cabbage
1/2 cup frozen green peas
1 large onion chopped finely
1 teaspoon ginger, minced
1 teaspoon minced garlic
1 bell pepper, finely chopped
2-3 teaspoons pav bhaji masala (spice mix available at Indian markets) (use less for less spicy bhaji)
1/2 teaspoon red chili powder or cayenne, or to taste
1/4 teaspoon turmeric powder
3 roma tomatoes, finely chopped
salt to taste
1/2 teaspoon lemon juice

Put the dal and water in a pot and bring to a boil. Reduce the heat to low and simmer until the dal is softened, about 15 minutes. Add more water if necessary to prevent it from drying out.

Cook the green beans, carrots, zucchini, and cabbage in water until soft. (I did this in the pressure cooker, with 1/2 cup of water at high pressure for 5 minutes.) When they're soft, add the peas and mash the vegetables well, in the liquid. Stir in the cooked dal.

Heat a good non-stick wok or large pot. Add the onions and cook, adding a little water as necessary, until they begin to brown, about 4 minutes. Add the ginger, garlic, and bell peppers and cook for another 2 minutes.

Stir in the pav bhaji masala, red chili powder, turmeric, and salt. Add the tomatoes, and cook until they start to break down, about 5 minutes. Add the mashed vegetables and salt to taste. Cook on low for about 20 minutes. Add lemon juice and serve on toasted buns, with pita bread, or as a dip.

Makes about 6 servings, each containing 169 Calories (kcal); 1g Total Fat; (4% calories from fat); 12g Protein; 31g Carbohydrate; 0mg Cholesterol; 39mg Sodium; 14g Fiber.

Tags:

Labels: , , ,

Bookmark and Share AddThis Feed Button


Tuesday, June 12, 2007

Maitake and Beech Mushrooms with Simmered Tofu on Sesame Rice

Maitake
Maitake Mushroom

I've been interested in mushrooms for a while and once even grew my own shiitakes on a log, a hobby that I'm planning to return to. But I've become a little more interested ever since picking up A Cook's Book of Mushrooms (ACBOM) while I was in New Orleans. Who knew there were so many types of mushrooms! After perusing it on the drive home, I began wondering how many of these exotic mushrooms I would be able to find in the grocery stores of Jackson, Mississippi.

The answer: Not many. But on a recent trip to Kroger I found that in addition to the ubiquitous white mushrooms, portabellas, and shiitakes, I could in fact sample some Maitake and Beech mushrooms, so I grabbed 4-ounce packages of both and put them in my cart and then in my fridge...where they sat and sat while I tried to figure out what to do with them. I consulted ACBOM, but it was pretty uninformative about beech mushrooms, referring to them only in passing as a look-alike of an uncultivated Japanese mushroom, shimeji, and including no recipes for them. Maitake mushrooms, also known as Hen-of-the-Woods, received a little more attention, one recipe and this statement: "The flavor is mild and goes well with smoked meats such as sausage and with cream sauces for pasta." Oops. I didn't intend to use them in either of those ways!

Fortunately, these mushrooms go with a lot more foods than this book gives them credit for. But a 4-ounce package of mushrooms will not go very far in any recipe, so when coming up with this dish, I used both the beech mushrooms and maitakes. Of the two, I found that maitakes have a stronger, more woodsy flavor, but I enjoyed the firm texture of the beeches. Both were absolutely delicious stir-fried along with some green beans, though I could see substituting other types of mushrooms for them.

Beech Mushrooms
Beech mushrooms

To use both mushrooms, I simply pulled them apart at the base. This is pretty obvious with the beeches, which are individual mushrooms joined together at the bottom, but the maitakes may be a little confusing to handle at first. Their rippling fronds are pretty delicate, so I just cut through the base enough to be able to separate them into manageable pieces.

And in case you're on the fence about mushrooms, maitakes are being studied for their possible cancer-fighting and imune system-building properties. And all mushrooms contain a variety of powerful phytochemicals and antioxidants whose disease-fighting properties have yet to be discovered. So eat up!

Maitake and Beech Mushrooms with Simmered Tofu on Sesame Rice

Maitake and Beech Mushrooms with Simmered Tofu on Sesame Rice
(click for printer-friendly version)

Make these recipes in the reverse order that they are listed. Put your rice on to cook about an hour before you plan to eat. Then, chop the vegetables and mushrooms, and cook your tofu. When it's done, make the stir-fry, which should be ready at the same time as the rice.

8 ounces green beans, ends trimmed and cut into 1-inch lengths
1/2 large yellow onion, cut into thin wedges
2 cloves garlic
1 teaspoon minced fresh ginger
4 ounces maitake or hen-of-the-woods mushrooms, cut apart along their natural lines
4 ounces beech mushrooms, separated
Simmered Tofu (see below)
1/3 cup water or vegetable broth
2 teaspoons low sodium soy sauce
1 teaspoon cornstarch
1 teaspoon sugar or agave nectar
1 teaspoon Sriracha sauce (or other chili sauce)--or to taste (1 tsp. may be too spicy for sensitive palates)
Sesame Rice (see below)

Spray a large skillet with a light coating of oil and heat it on medium-high. Add the green beans and 3 tablespoons of water and saute for four minutes. Add the onion and cook until for another 3 minutes. Add the garlic and ginger and the mushrooms and cook, stirring gently, until the mushrooms are tender, about 2 minutes.

Add the prepared tofu (below) to the pan. Mix the water with the soy sauce, cornstarch, sugar, and chili sauce and add it to the pan. Stir and cook until mixture thickens. Serve immediately over sesame rice.

Simmered Tofu:

1 package firm or extra-firm (non-silken) tofu (about 1 pound)
1/2 cup vegetable broth
1/2 teaspoon sesame oil
1 tablespoon low sodium soy sauce or tamari

Cut the block of tofu into pieces about 1/2-inch thick. In a large skillet, mix the broth with the sesame oil and soy sauce. Add the tofu and bring to a simmer on medium heat. Cook for about 10 minutes, or until sauce has almost all evaporated. Gently remove the tofu and place it on a plate. Cover to keep warm until ready to use.


Sesame Rice:

1 1/2 cups long grain brown rice
3 cups water
1 teaspoon sesame oil
1 teaspoon toasted sesame seeds or gomasio
1 teaspoon salt, or to taste

Put all ingredients into a pot and heat to boiling. Cover and lower heat to a simmer. Cook for 40 to 50 minutes, until water is absorbed and rice is tender. (You may also do this in a rice cooker.) Keep warm until ready to use.

Makes 6 to 8 servings. Based on 6 servings, each serving contains
339 Calories (kcal); 7g Total Fat; (18% calories from fat); 15g Protein; 58g Carbohydrate; 0mg Cholesterol; 542mg Sodium; 5g Fiber.

Tags:

Labels: ,

Bookmark and Share AddThis Feed Button


Friday, June 08, 2007

Questions and Answers

A friend of mine called me last night, saying "You haven't blogged all week." "Well," I answered without thinking, "I haven't eaten anything all week!"

Of course I have been eating. What I meant was I haven't eaten anything new or anything interesting. I've mainly been eating plain fruits and veggies in an attempt to shed a few pounds before summer temperatures force me out of long pants. So, since I don't have any interesting food to blog about, I thought I'd take a few minutes while E. is at the swimming pool with friends and answer a few of the questions that I've been too busy to answer.

By email, L. writes:

How do you maintain your veganism around friends and family that don't eat this way? How do you go out to eat when people visit? My husband still eats meat, and his mother is always bringing meat products and processed foods I cannot stand into my house. I cannot control what he eats, but it is very difficult for me to avoid some of these tempting foods, and I am a difficult person to go to a restaurant with unless I go vegetarian. I have been only vegetarian for the past few months due to stress and travel and I feel terrible. I am gaining weight and feeling depressed.

So please tell me, is your husband a vegan? Was he before you began this lifestyle? How do you deal with restaurants and visitors, grandmothers and others that would gift you food. I am really trying to get back on track and would love to hear how another mother deals with this.

Dear L., I'm sorry you're having a tough time of it. I think it can be very hard in the beginning, before people realize that you are serious about your change in diet. I'm very fortunate in that my husband stopped eating meat during the first year that we were dating. Even before he gave up meat, he ate very little of it and didn't cook it for himself, and he was already sympathetic to vegetarianism before we met. So I have never had to deal with some of the struggles that you are going through.

I do have an extended family that is not vegetarian, but to various degrees they've accepted our diet and try to accommodate us when we visit. When others visit us, I have tried to enforce a strict policy of "no meat in my house," but in practical application it hasn't worked. We've had people stay with us during hurricane evacuations and on friendly visits, and I can't ask people who eat completely different from us not to bring the foods they are used to eating. I do ask that they keep them in coolers, rather than in my fridge, and generally they do not expect to cook them on my stove.

Can you ask your husband to speak to his mother about your diet? Perhaps if you tell him how much stress it is causing you he will understand. Can he be persuaded to eat meat only when he is out of the house? Then he could visit his mother to eat the kinds of foods she wants to bring him.

As for dining out, I'm in the "make do" school of thought. Usually when I'm eating with other people, they will ask for restaurant suggestions and I steer them toward places that have something vegan on the menu. If I get to a restaurant and nothing's vegan, I'll ask if something special can be prepared. If that fails, I'll sit and have a drink and enjoy the conversation--I can always eat later. Also, if I expect that I may have trouble finding something vegan on the menu, I eat before I go; often just a couple of pieces of fruit is enough to keep me from pouncing on someone's french fries.

Do any of you have some suggestions for L?

In the comments to the Roasted Vegetable Napoleons post, Teresa asked:
"What else do you have growing in your garden?"

Teresa, I don't have a very big yard, but I'm trying to make the most of what I do have. This year, we added a new vegetable patch on the side of our house where we'd had to cut down a tree. In that patch, I have four kinds of tomatoes (plum, cherry, grape, and yellow), two types of bell pepper (red and chocolate), poblano peppers, okra, japanese eggplants, rosemary, and lavender. They're all kind of crowded together, and the tomatoes are taking over.

In the backyard, I have a patch that's about 10x4 feet, and it contains two heirloom tomatoes, more peppers, okra, and eggplant as well as several perennial herbs (oregano that wants to run wild, parsley, French tarragon, and rosemary) and one red cabbage left over from the fall. In containers I have at least 5 different types of basil and one tomato plant.

Here are a few photos:

Eggplant Plant
I love the purple stems and veins of eggplant plants.

Tomatoes
This is E's tomato plant, the one that's planted in a pot and the only one that has a tomato close to ripening (that orange color you see in the back).

Dark Basil
This basil is called "Purple Ruffles."

Variegated Basil
Here's a variegated basil that's so pretty that I haven't been able to bring myself to cut and eat it.

What do all of you have in your gardens?

Hannah asks, "Do you always make your own non-dairy milk? Do you think it is cheaper?"

I'd love to be able to say that I make all of our soymilk, but unfortunately I haven't found time to make it at all lately. Yes, I definitely think it's cheaper, if you just consider the money. But, if you figure in the time it takes to make it and clean up afterward, I'm not so sure. I've been finding soymilk on sale a lot recently, and I always buy a ton and stockpile it. I use the kind in the aseptic containers, which keep for months.

Well, that's all I have time for today. I apologize to anyone who has asked a question that I didn't answer. I love getting your emails and I always intend to reply, but sometimes just don't get around to it. Also, I have a very aggressive spam filter that often mistakes real messages for spam, so if you write and don't hear back from me, do try again. Unless you're trying to sell me something, get me to try or link to your product, or convince me to eat meat, I really don't mind if you keep writing until I remember to write back!

Tags:

Labels: ,

Bookmark and Share AddThis Feed Button


Sunday, June 03, 2007

Roasted Vegetable Napoleons

Fresh from the Farmers' MarketThe logo that you see to the left comes courtesy of Alanna of A Veggie Venture, who invites all of us bloggers to use it whenever writing about fresh produce. Hopefully it'll encourage everyone to seek out local sources of produce, wherever you live. Click on the blushing tomato to find your local farmers' market. (The logo was designed by the very talented Kickpleat of Everybody Likes Sandwiches.)

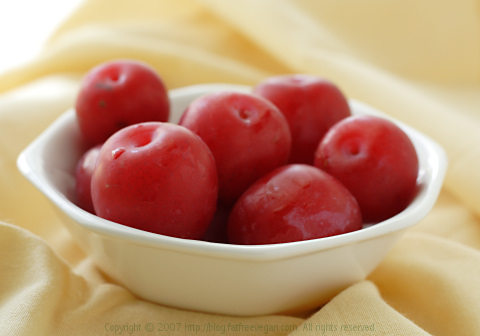
It's Farmers' Market season again! Here in Jackson, the farmers' markets and roadside farm stands all close in the winter (or the ones that stay open are very limited in what they offer). This weekend was the summer opening of the Mississippi Farmers' Market, which features produce, goods, and plants strictly from in-state farmers. I got a chance to drop in on Saturday and was thrilled to see at least three organic farms selling their goodies. I snagged some organic blueberries, green beans, a large costata romanesco zucchini, and some young garlic. I also got some sweet little plums that I started snacking on right away:

Local Plums

Late last week, E. and I paid a visit to the roadside farm stand near our home and came away with several bags full of fresh produce, including gorgeous, large eggplants, white pattypan squash, and lovely ripe tomatoes. Roasted Vegetable Napoleons, one of the most delicious things we have eaten lately, uses all three of those vegetables plus some dark opal basil from our garden.

This dish is either extremely easy or extremely complex, depending on your viewpoint. On the one hand, the method is so simple that I really don't need to provide a recipe: Roast some sliced veggies and then stack them up with pesto in between and top with caramelized onions and more pesto. On the other hand, making this left my kitchen in a complete shambles, took up all the space in my oven, and had me speeding around trying to make sure everything was done at the same time.

Roasted Vegetable Napoleon

Roasted Vegetable Napoleons

Rather than a recipe, here are some tips for putting this together.
  1. Marinate slices of eggplant (about 1/2-inch thick) for about 1/2 hour before roasting. I used a fat-free Italian dressing, but you can use whatever marinade you think will complement your vegetables.
  2. Slice other vegetables about 1/2-inch thick. (I used pattypan squash and tomatoes, but feel free to use what you have available.) Preheat the oven to about 425F and spray baking sheets or dishes with olive oil. Plan on about 2-3 slices of each vegetable for each napoleon.
  3. Put all the vegetables except the tomatoes in the preheated oven. Watch carefully, and just before the veggies appear done, put in the tomatoes (sprinkled with salt and pepper, if you wish). Tomatoes cook more quickly so they need less time. You can even put the tomatoes under a broiler to speed things up.
  4. While the vegetables are roasting, caramelize some chopped onions by sauteing in a non-stick skillet. Adding a little water as they cook and allowing it to cook off increases the browning and the caramelized flavor.
  5. Make the pesto while the vegetables roast. Follow your own favorite recipe or see my easy one below.
  6. When the vegetables are done, stack them on appetizer plates, alternating veggies and smearing just a bit of pesto between them. Sprinkle with browned onions and top with a large dab of pesto. Enjoy!
Here's the quick pesto I threw together for this recipe:

1 clove garlic
1/4 cup pine nuts
1/2 cup packed basil leaves (I used dark opal basil, which explains the purple specks)
1/4 cup panko or other dried bread crumbs
2 tablespoons water
salt to taste

Put the garlic and pine nuts into a food processor and process until finely chopped. Add the basil leaves and bread crumbs and pulse to chop. Add the water and salt to taste and process until it forms a thick, coarse paste. (Add more water by the teaspoon if necessary.)

Use this very concentrated pesto sparingly. I used about a third of this recipe to make 4 napoleons and saved the rest for other dishes.


My basil plants are growing like weeds, which to me signals the start of pesto season. Pesto is probably my favorite sauce, and I use it to flavor just about everything. If you're beginning to be blessed with summer basil, here are a few pesto recipes from the archives to help you get the most out of your harvest:

Basil and Bulgar Salad (aka Pesto Tabouli)

Asparagus Pesto Pasta Salad

Pasta with Roasted Vegetables and White Bean Pesto

Provençal Soupe au Pistou (Bean and Vegetable Soup with Pinenut Pesto)

Tags:

Labels:

Bookmark and Share AddThis Feed Button