Welcome to My Kitchen!

SusanV I'm SusanV, and I love good food. Join me as I create delicious dishes made with whole foods and without a lot of processed fat and sugar. Want to know more? Check out my FAQs, look through my recipe index, or get inside info on Facebook. Like what you see? Then subscribe to receive email updates. But above all, enjoy!


Latest Recipe


On FatFree Vegan Today

On FatFree Vegan Today


Current Faves


Sweet Potato Falafel

Skillet Gardener's Pie

Easy Mac and Cheeze
Easy Mac and Cheeze

Vegan Corned Beef and Cabbage

Colcannon Puffs
Colcannon Puffs


 Subscribe to comments


Recipe Index


Previous Posts


Archives


Posts by Topic

Cats | CORE* | Crock-Pot | Dogs | Eat to Live | E Cooks | Events | Flowers | Gardening | Gluten-Free* | Higher-Fat* | Holidays | Life | Louisiana | Nature | Pasta | Pressure Cooker | Ridiculously Easy | Southern Cooking | Soy | Travel  | Vita-Mix

*CORE designation is an approximation; this site has no affiliation with Weight Watchers International. Higher-fat recipes derive more than 15% calories from fat. Recipes marked gluten-free depend on use of specially-labeled gluten-free ingredients.

Search for Recipes:

Search Over 600 Vegetarian and Vegan Blogs:


Thursday, October 30, 2008

Pumpkin Cookies

Vegan Pumpkin CookiesWhat I love most about sharing recipes online is the conversation that follows, when readers share their tips and variations. I'm constantly getting ideas from you: ingredients I haven't tried, short-cuts that make a recipe faster, substitutions I've never thought of. Case in point, this email I received earlier this week from Emily Findley in Michigan:

So i am OBSESSED with your okara cookies! When I first read the recipe I couldn't help drooling but then I realized I didn't have any coconut! So what did I decide to do? Use pumpkin puree! Yup, I've made pumpkin okara cookies, substituting pumpkin puree for the coconut flakes and using more vanilla extract rather than any coconut extract....I also add a handful of oatmeal for a little extra crunch.

I was immediately intrigued. I've been in a pumpkin-cookin' mood lately, but pumpkin cookies hadn't even occurred to me. I had to check them out. As it turns out, I wound up making two versions of these delicious cookies!

Following Emily's lead, I substituted pumpkin for the coconut and added a little oatmeal for texture. Emily had used honey instead of sugar, so I decided to use agave nectar for sweetening. She also prescribed adding lots of spices, which add a pumpkin pie-taste to these fabulous treats. To make them a little sweeter and more kid-friendly, I iced half of the cookies with pumpkin-colored frosting. It worked! My daughter immediately claimed all of the frosted cookies as "hers." She liked them so much that she would have eaten all of them in one sitting if I'd let her.

Fat-free Pumpkin Cookies

Fat-Free Pumpkin Cookies
(printer-friendly version)

1/2 cup whole wheat flour (I used white whole wheat flour)
1/2 cup unbleached flour
1/4 cup rolled oats
1/2 teaspoon baking soda
1 teaspoon cinnamon
1/2 teaspoon ginger
1/4 teaspoon nutmeg
1/4 teaspoon salt
1/2 cup agave nectar
1/2 cup canned pumpkin
2/3 cup okara (or 8 ounces firm tofu, blended in a food processor until smooth)
1 teaspoon vanilla extract
1 tablespoon turbinado sugar -- or icing, below

Preheat oven to 375F.

Mix the flours, oats, baking soda, spices, and salt in a mixing bowl. Mix the agave nectar, pumpkin, okara (tofu), and vanilla in another bowl. Add the wet ingredients to the dry and stir just until well-blended. Do not over-stir.

Use a cookie scoop or tablespoon to drop rounded tablespoons of dough at least two inches apart on a baking sheet lined with a silicone baking mat or parchment paper. Flatten each cookie slightly with a fork. Sprinkle with turbinado sugar, if desired. Bake for 10-16 minutes or until edges are golden and middles seem done. Remove from oven and allow to cool for 5 minutes before transferring each cookie to a wire rack. Allow to cool completely before serving.

Optional icing:

1 cup confectioners' sugar
2 teaspoons agave nectar
2 teaspoons non-dairy milk
1/4 teaspoon vanilla extract or other extract (I used pecan)
food coloring (optional)

In a small mixing bowl, add the agave nectar, milk, and extract to the confectioners' sugar. Add additional milk a half-teaspoon at a time, stirring constantly, until the icing is smooth and spreadable but not so thin that it runs off. If you add too much milk, add a little more sugar to balance it out. Add food coloring a drop at a time until the right color is achieved. Spread over cooled cookies and allow to dry.

Makes about 15 cookies. Per cookie (with sugar, no icing) : 76 Calories (kcal); trace Total Fat; (3% calories from fat); 1g Protein; 18g Carbohydrate; 0mg Cholesterol; 78mg Sodium; 1g Fiber. Weight Watchers: 1 Point.

With icing: 110 Calories (kcal); trace Total Fat; (2% calories from fat); 1g Protein; 27g Carbohydrate; 0mg Cholesterol; 78mg Sodium; 1g Fiber. Weight Watchers: 2 Points.


Fat-free cookies are fine for here at home, but I'm always afraid they're a little too rubbery to serve to people who aren't used to fat-free baking. When I'm entertaining or bringing food to a party, I like to avoid serving anything that tastes too "healthy" because people will get the (wrong) idea that it tastes that way because it's vegan when, in fact, it's the lack of fat that makes it heavier and chewier. So while I had the oven hot and my counters all covered with flour and pumpkin, I made a second, not fat-free version using 1/3 cup of Earth Balance margarine instead of half of the okara. The results were amazing--light, tender cookies that melt in your mouth. And since I added extra sugar to the batter, they don't need any icing or sugar on top, though a little orange icing would make them perfect at any Halloween party. But please don't present them as health food!

Lower-fat Pumpkin Cookies

Pumpkin Cookies
(printer-friendly version)

1/2 cup whole wheat flour (I used white whole wheat flour)
1/2 cup unbleached flour
1/4 cup rolled oats
1/2 teaspoon baking soda
1 teaspoon cinnamon
1/2 teaspoon ginger
1/4 teaspoon nutmeg
1/8 teaspoon cloves
1/4 teaspoon salt
1/3 cup Earth Balance Margarine, softened
1/4 cup brown sugar
1/2 cup sugar
1/3 cup okara (or 4 ounces firm tofu, blended in a food processor until smooth)
1/2 cup canned pumpkin
1 teaspoon vanilla extract

Preheat oven to 375F.

Mix the dry ingredients (flour through salt) in a medium bowl. In a large bowl, cream together the margarine and sugar. Beat in the okara, pumpkin, and vanilla extract, until well-blended.

Add the flour mixture a little at a time to the wet ingredients, stirring well after each addition. Use a cookie scoop or tablespoon to drop rounded tablespoons of dough at least two inches apart on a baking sheet lined with a silicone baking mat or parchment paper. Bake for 10-14 minutes. Remove from oven and allow to cool for 5 minutes before transferring to a wire rack to cool completely.

Makes about 15 cookies. Per cookie: 109 Calories (kcal); 4g Total Fat; (35% calories from fat); 1g Protein; 17g Carbohydrate; 0mg Cholesterol; 122mg Sodium; 1g Fiber. Weight Watchers: 2 Points.


Thanks, Emily, for the great idea and for allowing me to share it with everyone. Now, could someone get me away from all these cookies?!

Before I forget:


Cathleen at Vegan Nutritionista recently asked me to answer a few questions about my experience as a vegan. You can check out the interview here.

Labels: , ,

Bookmark and Share AddThis Feed Button


Saturday, October 25, 2008

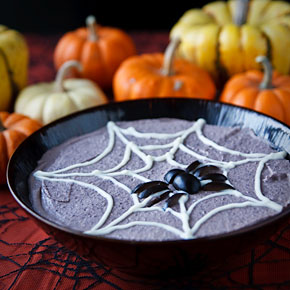
Spooky Black Bean Hummus

Spooky Black Bean HummusI have two standard Halloween recipes in my, ahhem, repertoire. One of them involves baking the equivalent of a 4-layer chocolate cake in the shape of a pumpkin; it contains a gazillion calories and takes most of an afternoon to make. As you can probably guess, I don't make that one very often. When I need a Halloween-themed food for a party, I'm much more likely to whip up this black bean dip, which takes about 10 minutes and, if you scoop it up with carrot sticks or rice crackers, is one of the lighter dishes you'll find at most parties.

I vary the ingredients every time I make it. Sometimes I treat it as a regular hummus, with lemon juice and a pinch of paprika; other times it's more of a Southwestern bean dip, with chili powder and even tomatoes. I took the middle road this time and used lime juice instead of lemon and chipotle pepper instead of paprika. Unfortunately, I went a little overboard and added too much chipotle, resulting in a dip that was overly smoky and too spicy to serve to unsuspecting party-goers. To balance out the heat and smokiness I started adding soy yogurt by the tablespoon. As it turns out, I like the creaminess the yogurt imparts, so I'm leaving it in the recipe. My advice is to add the chipotle a little at a time; if you add too much, its smoky flavor borders on bitter.

Spooky Black Bean Hummus

Spooky Black Bean Hummus
(printer-friendly version)

2 cloves garlic
2 15-ounce cans black beans, drained and rinsed
2 tablespoons tahini
3 to 4 tablespoons lime (or lemon) juice
1 teaspoon cumin
1/8 to 1/4 teaspoon chipotle pepper -- to taste
3 tablespoons unsweetened soy yogurt (optional)
1/2 teaspoon salt (or to taste)
For Design: additional plain soy yogurt or tahini

With food processor running, drop in the garlic cloves and process until finely chopped. Add the black beans, and process until pureed. Add the remaining ingredients (use the lesser amounts) and process until smooth. Taste and correct seasonings, adding more as needed.

Spoon the hummus into a serving dish, smoothing the top. Using a pastry bag and either soy yogurt or thinned tahini, pipe on the design. Place a plastic spider into the web, or make one yourself from black olives. Refrigerate until ready to serve.

Makes 10 servings. Per serving: 96 Calories (kcal); 2g Total Fat; (22% calories from fat); 5g Protein; 13g Carbohydrate; 0mg Cholesterol; 373mg Sodium; 5g Fiber. Weight Watchers: 1 Point.

Labels: , , ,

Bookmark and Share AddThis Feed Button


Wednesday, October 22, 2008

Pasta with Peppers and Sausage

Pasta with Peppers and Seitan SausageI don't know what happened to revolutionize the way whole wheat pasta is produced, but something must have. It's evolved, in my opinion, from a heavy, grainy-tasting, fall-apart-if-you-slightly-overcook-it punishment for eating healthy into a delicious food that my whole family enjoys.

I decided a few years ago that when it came to pasta, I'd stick with flavor over nutrition and use regular semolina or rice pasta for those rare times when I cook pasta. Then I started following Weight Watchers' Core program, which allows limited amounts of whole wheat pasta, and I decided to give it one last try. To my surprise, the newer ww pastas are lighter and less starchy than the dark whole wheat pasta I used to buy from the bulk bin of the health food store, and instead of tasting chalky or grainy, they're either pleasantly bland or slightly nutty (which actually works well with heartier sauces and seasonings). My daughter no longer complains when I use whole wheat pasta--in fact, she doesn't seem to notice at all. I still consider pasta an occasional treat, but I no longer feel like I have to give it up completely--or suffer through arrabbiata that tastes like cardboard!

If you haven't given whole wheat pasta a try recently, give it another chance. If you're not sure which brand to buy, check out this taste test of 5 of the better whole wheat pastas.

A nuttier-tasting whole wheat pasta will work well with this recipe, with its flavorful roasted peppers and highly-seasoned vegan sausage. I've been craving vegan sausage for a while, and I finally got around to making up an Italian version of the Irish sausages I made around St. Patrick's Day. Both recipes were inspired by Julie Hasson, whose steaming method produces the most tender gluten sausages I've ever made. Of course, if you make this pasta with packaged sausage rather than homemade, you'll be able to get this dish on the dinner table in under a half hour...but I think you'll be missing out on some seriously good sausages!

Pasta with Peppers and Sausage

Pasta with Peppers and Sausage
(printer-friendly version)

1/2 recipe Italian Fauxsages (below) or 10-12 ounces other vegan sausage, sliced
1/2 red bell pepper, cut into 1-inch strips
1/2 green bell pepper, cut into 1-inch strips
1/2 yellow bell pepper, cut into 1-inch strips
8 ounces whole wheat rotini
1/2 cup red onion, minced
2 teaspoons tomato paste
1 large tomato, diced
2 cloves garlic, minced
1 pinch red pepper flakes
8 basil leaves, chopped
salt and pepper to taste

Spray a baking sheet lightly with olive oil, put it into the oven and preheat to 450F. Once it's heated, spread the peppers on one half of the sheet and the sausages on the other. Give them a quick spray of olive oil. Cook, stirring every few minutes, until the peppers just begin to get charred along the edges, about 10 minutes. Remove from oven and keep warm.

While the peppers are cooking, cook the pasta according to package directions. Before draining, remove one cup of the cooking liquid and reserve it. Drain the pasta, toss it with the peppers and sausage, cover, and keep warm.

Spray a medium-sized saucepan lightly with olive oil and heat it on medium-high. Add the onions and cook, stirring, until they soften, about 4 minutes. Add the tomato paste and cook for another minute. Stir in the tomato, garlic, and red pepper and cook for another two minutes. Add 3/4 cup of the reserved pasta liquid and simmer for about 5 minutes. Stir in the minced fresh basil, and add salt and black pepper to taste. Toss with the pasta to coat lightly, adding additional pasta liquid to moisten, if necessary. Serve immediately.

Makes 4 servings. Per serving: 331 Calories (kcal); 3g Total Fat; (8% calories from fat); 23g Protein; 57g Carbohydrate; 0mg Cholesterol; 441mg Sodium; 8g Fiber. Weight Watchers Core?/ 6 Points (see note below).


Italian Fauxsages (Seitan Sausages)
(printer-friendly version)

1 vegan bouillon cube
1/3 cup oatmeal (rolled or quick oats, uncooked)
1 cup vital wheat gluten
2 tablespoons nutritional yeast
1/2 tablespoon onion powder
1/4 teaspoon black pepper
1 teaspoon oregano
1/2 teaspoon ground sage
1/2 teaspoon basil
1/2 teaspoon red pepper flakes
1/2 teaspoon fennel seeds
1/4 teaspoon smoked salt (optional)
1 teaspoon ground flax seeds
1 cup water
3 cloves garlic, minced
1 tablespoon tahini or olive oil (optional)
1 tablespoon soy sauce

Dissolve the bouillon cube in 2 tablespoons of boiling water and set aside to cool. Put the oatmeal into a blender and pulse to chop coarsely.

Place the oatmeal into a large bowl and add the remaining dry ingredients, wheat gluten through flax seeds, stirring well to distribute the seasonings evenly. Mix the bouillon mixture with the cool water in a large measuring cup or bowl and add the garlic, tahini, and soy sauce. Whisk or blend with a hand blender until ingredients are well-distributed.

Pour the wet ingredients into the dry, and stir to mix just until evenly moistened. Add a little more water if it seems too dry.

Place a piece of aluminum foil on the counter, and scoop 1/2 cup of gluten mixture onto it. Shape into a rough tube, fold the bottom edge of the foil over the gluten, and roll up. Roll the tube back and forth, pressing lightly with your hands, to give it an even shape, and then twist the ends closed. Repeat with the remaining gluten to form 5 sausages.

Place all the sausages in the top of a steamer, cover, and steam for 40 minutes. Remove them from the heat and let cool (refrigerating will make them firmer). Fauxsages can then be used in recipes as-is, but baking or pan-frying lightly will make them firmer and browner.

Makes 4 servings. Per serving (with tahini): 205 Calories (kcal); 5g Total Fat; (20% calories from fat); 28g Protein; 14g Carbohydrate; 0mg Cholesterol; 821mg Sodium; 3g Fiber. Weight Watchers 4 Points / Core? (use olive oil instead of tahini).

Weight Watchers Note: Technically, vital wheat gluten is not a Core food. However, since some packaged vegan meat substitutes are on the Core list, I choose to count this sausage, without tahini, as a Core food in my food plan. My reasoning is that something I make myself at home has to be healthier than products made of hydrolyzed vegetable protein and chemicals. As always, my opinions and points calculations are not those of Weight Watchers, Inc., so please use your own judgment when planning your meals.

Labels: ,

Bookmark and Share AddThis Feed Button


Friday, October 17, 2008

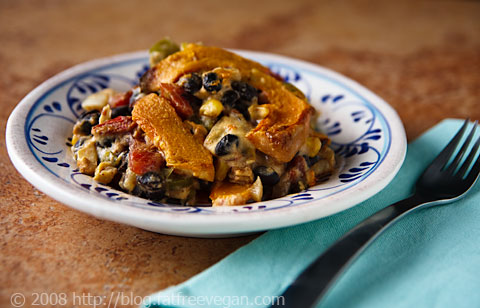
Pumpkin and Black Bean Casserole

I'd like to begin this pumpkin recipe with an unintentionally Halloweenish photo:

Halloween Pumpkin and Friend

Look closely. I was trying to take a basic photo of our homegrown pumpkin--the accidental result of tossing last year's seeds into the compost pile--when someone decided that she would make a better subject. So what you see here is an accidental photo of an accidental pumpkin. There's probably a moral here somewhere, something like "the best things happen by accident," but I prefer to think of the photo and the pumpkin as representative of the way I work: throw enough scraps into the compost, photos onto the memory card, or ingredients into the pot, and I'll eventually come up with something worth growing, viewing, or eating.

And this little pumpkin was definitely worth growing and eating. When D and I first noticed a pale green and white, oval-shaped fruit hanging from a thick vine, we didn't know what it was. Gradually it took on a more traditional pumpkin shape and color, and when it stopped getting any larger, I decided that it was the offspring of one of last year's pie pumpkins. Weighing in at just over 2 pounds, it probably would have been just the right size for a pumpkin pie, but I decided to do something a little less traditional with it.

Sliced Pumpkin

My idea was to make a layered casserole, sort of like Mexican Lasagna, but with slices of pumpkin instead of tortillas. The resulting casserole didn't come out looking quite so neatly layered, but I think it fits my "toss enough ingredients" theme just about perfectly. It won't win any beauty contests, but who cares? It's all about the flavor, and in this case, melt-in-your-mouth slices of pumpkin plus cumin-kissed black beans and a creamy, cheesy-tasting sauce equal a real winner!

Pumpkin and Black Bean Casserole
This dish is actually uglier than it appears in this photo! Consider yourself warned.

Pumpkin and Black Bean Casserole
(printer-friendly version)

1 1/2 cups cooked black beans (or one can, rinsed and drained)
1/2 cup corn, fresh or frozen
1 medium onion, finely chopped
1/2 bell pepper, finely chopped
2 cloves garlic, minced
1 teaspoon cumin
1 teaspoon ancho chili powder (or other mild chili powder)
1/8 - 1/2 teaspoon chipotle chile powder (to taste)
15 ounces canned tomatoes, drained and liquid reserved*

1 pound pumpkin (about 1/2 one small pumpkin) or any winter squash (butternut, acorn, etc.)

3/4 cup soymilk or other non-dairy milk
1/2 cup nutritional yeast
3 tablespoons cornstarch
1/2 teaspoon salt
1/2 teaspoon mustard powder
1/2 teaspoon Spanish paprika
1 tablespoon tahini (optional)

In a large bowl, combine the black beans with the next 8 ingredients and set aside.

Cut the pumpkin in half. Set aside one half for another use and peel the other half. Cut it into very thin slices about 1/4-inch thick and 2 inches long.

Preheat oven to 425F. Spray a 2-quart casserole dish with canola oil. Lay one-third of the pumpkin slices in the bottom of the dish, and sprinkle lightly with salt and pepper. Cover with half of the bean mixture. Repeat layers with another third of the pumpkin and the remainder of the beans. Finish with the final third of the pumpkin slices.

In a blender, combine the reserved *tomato liquid (about 1/2 cup) with the soymilk and remaining ingredients. Blend well and pour over the pumpkin. Cover tightly, and bake for 30 minutes. Remove the cover and bake for 20-30 minutes, until sauce is thick and bubbly and pumpkin is tender.

*If you prefer to use fresh tomatoes, use one cup of chopped tomatoes and substitute 1/2 cup of water for tomato juice in the sauce recipe.

Makes 4 servings. Per serving: 296 Calories (kcal); 4g Total Fat; (11% calories from fat); 19g Protein; 53g Carbohydrate; 0mg Cholesterol; 463mg Sodium; 13g Fiber. Weight Watchers 5 Points / Core (without tahini).

Labels: , , , , ,

Bookmark and Share AddThis Feed Button


Saturday, October 11, 2008

Two Chickpea Salads

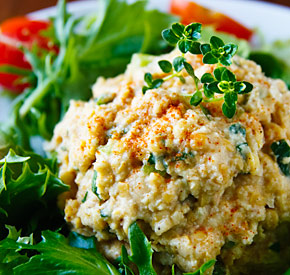
Creamy Chickpea Salad with Fresh HerbsOctober may seem like a strange time to be writing about salads, but even in the cooler months, I like to eat salads for lunch. I load up on raw vegetables for my midday meal and concentrate on cooked veggies, beans, and grains for dinner. But raw vegetables don't really fill me up or keep me going all afternoon; I need something with staying power. That's where chickpea salads come in. Served atop a big salad of lettuce, spinach, cucumber, and tomatoes, they add flavor and texture as well as protein.

As soon as you take a look at the ingredients of these salads, you'll notice that they have something more than chickpeas in common. Yes, I added okara, the soy pulp left over from all the soymilk I've been making. Since I'm making all of our soymilk now, I'm winding up with heaps (some would say mountains) of okara, and it's made its way into everything from burgers to cornbread. But I did a silly thing one day and tasted it straight out of the machine, and it tasted good, once I added a little agave nectar and vanilla to it--kind of like cream of wheat. Since that experience didn't kill me, I decided to just start tossing okara into dishes that weren't cooked, and my first chickpea-okara salad was born.

Now, I know that most of you aren't making soymilk, and though you can buy okara at some Asian markets, it isn't that easy to find, especially in its fresh (wet) form. But the great thing is that tofu, either silken or regular, will work, too. The purpose of the okara is to add some creaminess without adding a lot of mayo, and tofu will do the same thing. Tofu is higher in fat and calories, however, and it lacks okara's fiber, so if you have okara, then you should definitely use it.

This first salad is my favorite. I used fresh thyme and parsley from my garden, and I loved the clean, herbal taste they gave it. My husband said it tasted like tuna salad, but I think he's hallucinating because I didn't put anything fishy in it. If you have fresh herbs, use them--you could even experiment with basil or oregano--but if not, give it a try with dried thyme.

Creamy Chickpea Salad with Fresh Herbs

Creamy Chickpea Salad with Fresh Herbs
(printer-friendly version)

1 1/2 cups cooked chickpeas
1/2 cup okara or tofu, mashed well
2 tablespoons Nayonaise (or other vegan mayo)
1/2 tablespoon Creole mustard
1/4 teaspoon Old Bay Seafood seasoning* (or to taste)
2 teaspoons lemon juice
1 teaspoon soy sauce
1 rib celery, minced
1/2 teaspoon salt, or to taste
1 teaspoon fresh thyme leaves (or 1/4 tsp dried)
1 tablespoon minced fresh parsley
1/4 teaspoon paprika
generous grating of black pepper

Mash the chickpeas well with a potato masher. Add all remaining ingredients and taste, adding more seasonings if necessary. Refrigerate until chilled. Serve as a sandwich filling, as a dip with crackers, or atop a bed of greens.

*The main ingredient of Old Bay is celery salt, so you can replace it with celery salt and a pinch or two of red pepper.

Makes 4 servings. Per serving (with okara): 138 Calories (kcal); 4g Total Fat; (25% calories from fat); 6g Protein; 20g Carbohydrate; 0mg Cholesterol; 453mg Sodium; 4g Fiber. Weight Watchers 2 Points (Core + 1/2 pt. for mayo)

With reduced fat tofu: 154 Calories (kcal); 5g Total Fat; (26% calories from fat); 9g Protein; 20g Carbohydrate; 0mg Cholesterol; 454mg Sodium; 3g Fiber. Weight Watchers 3 Points (Core + 1/2 pt. for mayo.)


I enjoyed the curried chickpea salad below with Edward & Sons brown rice snaps, which are low in calories and fat, as well as gluten-free. (Attention Weight Watchers: 8 crackers are just one point!) Later, my husband tried it and said it tasted like shrimp salad. Seriously, I don't know where he comes up with these ideas!

Curried Chickpea Salad

Curried Chickpea Salad
(printer-friendly version)

Use a good, mild curry powder, one that you know you like.


1/2 medium onion, minced
1/2 bell pepper, minced
1/2 hot chile pepper, seeded and minced (optional)
1 teaspoon good curry powder
1/4 teaspoon cumin
1 1/2 cups cooked chickpeas
1/4 cup okara or silken tofu, mashed well
1 tablespoon lemon juice
1 tablespoon Nayonaise or other vegan mayo (optional)
1 teaspoon salt (or to taste)
generous grating black pepper
Optional: chopped celery and/or tomato (Use if you want a lighter salad, more suited to a side-dish than a dip.)

In a small saucepan, HTML clipboardsauté onion over medium-high heat until it softens, about 2-3 minutes. Add bell pepper and hot pepper, if using, and cook another minute. Add curry powder and cumin and cook for 30 seconds. Remove from heat.

Mash chickpeas in a medium-sized bowl. Add the onion mixture and all remaining ingredients. Stir well and check for seasoning. If necessary add a little more curry powder, salt, or lemon juice. Refrigerate until chilled.

Makes 4 servings. Per serving: 137 Calories (kcal); 3g Total Fat; (18% calories from fat); 7g Protein; 23g Carbohydrate; 0mg Cholesterol; 568mg Sodium; 4g Fiber. Weight Watchers Core (w/o mayo) / 2 Points.

Labels: ,

Bookmark and Share AddThis Feed Button


Monday, October 06, 2008

Tofu with Lobster Mushrooms in Ginger Broth

Tofu with Lobster MushroomsSome tourists visit places of scenic beauty, others seek out man-made wonders like cathedrals and museums, but when I travel, I look for... grocery stores!

Okay, that's not strictly true. I tend to start with the scenic spots, take in a man-made wonder if it's nearby, and then, if time allows, head for a grocery store. I like to visit local natural food stores and chain stores that we don't have in Mississippi to look for items I can't find here. I've come home with treasures like pure horseradish sauce from Sunny Farms in Sequim, Washington, and veggie jerky from New Frontiers in Sedona, Arizona. Unfortunately, my husband doesn't believe in sightseeing in grocery stores, so unless we actually need groceries, he doesn't want to "waste" time shopping. I've always let him convince me that there are more scenic and important ways to spend our vacation time, until this summer when, strolling through the North Beach area of San Francisco, we rounded a corner and came face-to-door with Trader Joe's. We didn't need any groceries, but after years of hearing about Trader Joe's, I wasn't going to miss my chance to see what all the excitement is about.

As far as I can see, the excitement is about prices; on everything from wine to vegan toothpaste, Trader Joe's had some of the lowest prices we'd ever seen. Since we had a day of walking ahead of us and a flight home to consider, we weren't really able to take advantage of the low prices, so other than a few boring, easily packed items like toothpaste, we left Trader Joe's without much of anything of interest.

The one exception was a little package of dried Lobster Mushrooms, an unusal looking mushroom that I'd never seen before. Being a lover of all things mushroomy, I picked up a package to bring home, where they went into the cupboard until I could think of the perfect way to use them.

Lobster Mushrooms

Lobster mushrooms get their name from their red-orange coloring and, I believe, from their unusual flavor, which has just a hint of the sea about it. (I can't tolerate anything very fishy-tasting, so rest assured that any seafood taste is just barely perceptible.) I decided that they'd be the perfect accompaniment to my delicately flavored, homemade tofu, and I was right. Simmered in mushroom broth, flavored lightly with ginger, the tofu maintained its fresh taste, while the lobster mushrooms provided a contrasting, firmer texture.

I served this easy, light dish over buckwheat soba noodles alongside stir-fried broccoli and water chestnuts for a delicious dinner. You don't have to use fresh tofu or even lobster mushrooms, but they really do make it special. If they're not available, try one of the other dried mushrooms noted in the recipe below.

Tofu with Lobster Mushrooms in Ginger Broth

Tofu and Lobster Mushrooms in Ginger Broth
(printer-friendly version)

Lobster mushrooms give this dish a unique taste, but shiitake, porcini, or other mushrooms would be tasty too.

1/2 ounce dried lobster mushrooms (may use shiitake or other mushrooms)
1 1/2 cups water
1 tablespoon ginger root, minced
1 clove garlic, minced
1/8 teaspoon red pepper flakes (or to taste)
2 tablespoons soy sauce
1 teaspoon sugar
1 tablespoon mirin or rice wine
8 ounces firm tofu, cut into cubes
1 tablespoon mellow white miso

In a medium-sized saucepan, simmer the mushrooms in the water for 30 minutes. Remove the mushrooms to a cutting board and pour the mushroom broth through a fine-mesh strainer into a 2-cup measuring cup. Add enough water to reach the 2-cup mark, and return the broth to the pan. Chop the mushrooms and add them to the pan, along with all ingredients except the miso.

Simmer on very low for 15 minutes. Stir miso into 1/4 cup water until it forms a smooth paste and add it to the tofu. Stir gently and return to heat for about 1 minute, and then serve over soba noodles or whole grain, garnished with sliced green onions.

Makes 3 servings. Per serving: 110 Calories (kcal); 4g Total Fat; (29% calories from fat); 8g Protein; 13g Carbohydrate; 0mg Cholesterol; 935mg Sodium; 1g Fiber. Weight Watchers 2 Points.

Labels: , ,

Bookmark and Share AddThis Feed Button


Sunday, October 05, 2008

And the Soymilk Maker Goes to...

751 comments! In my wildest dreams (or scariest nightmares, depending on how you look at it) I never imagined I'd get that many responses to my contest. I'm bleary-eyed from reading them all--yes, I read them all, though they began to run together after the first hundred, so I can't tell you who said what! It was worth it, though, to see how many of you are interested in making your own soymilk and tofu at home.

Just minutes after I closed the contest, I had the random number generator pick a winner. Without further ado, here are the results:


The winner is number 722, Caitlin Hyland, who wrote, "This looks great! I am a penny-pinching college student on a budget and always try to focus on reducing my higher food costs because I choose quality organic ingredients. I love new ideas like this and it would be awesome to win this soy milk-maker!!" Congratulations, Caitlin! Please email me your mailing address.

Thank you all for entering. I wish I could afford to hand out prizes to everyone.

Several of you had questions about the process of making soymilk or tofu, and rather than answer them in the comments, I'll try to answer them here. In no particular order...

What form of soybeans do you use? in the pod, shelled or...? Because when you said you remove the skins by rubbing, I really was confused, since I just eat them in the pod or shelled and have never noticed a skin to rub off. HELP please!

Sorry for the confusion. The soybeans are dried. If you squeeze one after it's been soaking, you'll find that it has a translucent skin that will come off. When the soybeans are green, as in edamame, I think this skin adheres to the inside of the pod, so you never notice it.

Do you have a recommendation for calcium supplements?


I like VegLife vitamins because they are all vegan and reasonably priced. Also, the vegan version of Dr. Fuhrman's Osteo-Sun is very good because it combines Vitamin D with calcium in the correct proportions. It's more expensive, though.

WHAT DO YOU DO WITH ALL THE OKARA????? I can't make cookies every day (well, I could, but I shouldn't).

It does get to be a lot, and I can't make cookies every day either. Lately I've been adding vanilla extract after the soymilk is made so that I don't have vanilla-flavored okara. I've been using it to make veggie burgers and "crab" cakes, and I plan to start adding it to homemade bread. I'll be posting my burger recipe, though maybe not right away.

Can you pre-flavor into your tofu while you are making it, not after?

You can add herbs or spices after the soymilk has curdled and before pressing it. I haven't done it yet, though.

Is fresh tofu easily "freezable"?

Yes, you can freeze it just like packaged tofu--and its texture will change like regular tofu, becoming spongy and coarser in texture. Just wrap it well in plastic before freezing.

Can the soymilk maker be used to make other kinds of milk too?

Yes, it will also make milk from rice, oats, millet and other grains, almonds, hazelnuts, and mung beans--as well as combinations of those ingredients. It will not make raw milks, though the older version of the machine will.

How long does the homemade soymilk keep? Is the fridge life much shorter than commercial brands?

Since it doesn't contain any preservatives, I wouldn't feel safe using it after 5 or 6 days. When in doubt, smell it to make sure it hasn't gone bad.

Does one batch of soy milk make one block of tofu?

I'm able to get about 8 ounces, or a half-sized block, out of one double-strength batch of soymilk (soymilk made using twice as many soybeans as usual). Using a different coagulator and letting it curdle for a longer time might increase the amount of tofu.

Is there a substitute for agave nectar?

I'm not sure if you mean specifically in soymilk, but generally you can use another sweetener, such as granulated sugar, maple syrup, or rice syrup, anywhere agave nectar is called for. I like agave in soymilk because it has a light taste and dissolves easily.

Can you make silken tofu at home?

From what I've read, it's very difficult to make silken tofu at home, and I've never tried.

Have you ever made homemade tempeh? I've been wanting to try that for some time now, but I still haven't figured out what to use for an incubator.

I'm afraid I haven't. I once bought tempeh starter on a whim, but I never got around to using it. Like you, I'd like to give it a try someday. Fresh tempeh is supposed to be very delicious.

Can you send or post on this blog the exact name of the product and the item number for us in case we want to order one off Amazon?

Here's a link to the SoyQuick Premier 930P at Amazon. If you look carefully, there are instructions there on how to get free shipping. You can also order it directly from the SoyQuick website. Just click SoyQuick website!


If there are any questions I missed, just ask and I'll try to answer them in the comments. I promise to post the recipe I made with my fresh tofu tomorrow . For now, I need to rest my eyes a little!

Labels:

Bookmark and Share AddThis Feed Button


Wednesday, October 01, 2008

Making Tofu

[Update: Comments are now closed. Expect a winner to be announced soon!]

Happy World Vegetarian Day! Keep reading if you're interested in winning a new soymilk maker! See the end of this post for details.


I never thought tofu had a flavor until a few years ago when I first made my own. Up until then, I thought of it as a blank slate, something to suck up the flavors of whatever it was cooked with. But the first time I made my own tofu I discovered that though it also has a mild taste, it's somehow creamier, richer, and better-tasting than packaged tofu.Fresh Homemade Tofu

Making tofu is really not as difficult as you might think, especially if you use a soymilk maker to make the soymilk first. The soymilk machine heats the milk to just the right temperature; from there you need only to mix in a coagulant, which causes the soymilk to curdle, and pour the curds into a cheesecloth-lined container that has holes punched in it to allow the whey to drain off. You can even make tofu in a strainer or colander, if you're not a stickler about having a rectangular block of tofu.

With food prices so high, I've been trying to save money anywhere I can, and making my own soymilk and tofu make a big difference in my weekly grocery bill. I buy organic soybeans for $1.19 a pound at my local natural food store. From that pound of beans, I can make six 1.5-liter batches of soymilk or three 8-ounce batches of tofu. That's the equivalent of 9 of those aseptic boxes of soymilk for $1.19! Besides the obvious savings, making my own soymilk and tofu reduces waste and is better for the environment because there are no packages to throw away. I keep my homemade soymilk in reusable glass pitchers similar to these; my homemade tofu gets used so quickly that there's no need to store it in anything other than the press I use to make it.

I'd like to show you the steps I go through when making tofu, but this isn't really a recipe. If you'd like more info about the process--particularly for making tofu without a soymilk machine--there are lots of websites that give you more of the nitty gritty details. Check the end of this post for a couple of links--and for a chance to win your own SoyQuick!

SoyQuick Soymilk Maker

I begin by making soymilk with twice the usual amount of soybeans and the minimal amount of water. The night before, I start the soybeans soaking in enough water to cover by a couple of inches. In the morning, I drain and rinse the beans well. If I'm making soymilk, I often remove the beans' skins by rubbing them between my fingers in a pan of water, but I skip this step if I'm making tofu.

In the new filterless SoyQuick, the beans and water go straight into the bottom of the machine together. I add water to the lower line and then put in the beans and press the "Soymilk" button. The machine grinds the soybeans while cooking them.

Straining the Soymilk

Once the machine beeps and the soymilk is ready, I pour the soymilk through the strainer into the transfer jug (both included with the machine). The okara (soy pulp) collects in the strainer, and I set it aside to use later. If I were making soymilk, I could either stop here or strain the soymilk one more time through cheesecloth as I'm transferring it into the glass container I store it in.

But since I'm making tofu, I add a packet of coagulant to the soymilk in the transfer jug and cover the top with a plate to rest for about 20 minutes. I used the SoyQuick brand coagulant (magnesium chloride), but you can also buy nigari and gypsum to use as coagulants.

Curds and Whey

After about 20 minutes I check to see that the soymilk has coagulated and separated into curds and whey. I pour it back through the strainer, which I set over a bowl to catch the whey. (I use the whey to water my plants; it contains nutrients that are beneficial to them.)

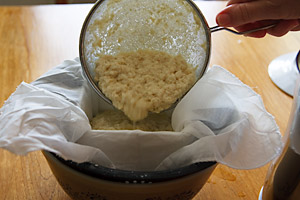
Curds into the Tofu Press
Once the curds are all in the strainer, I pour them into the cheesecloth-lined tofu press, which I've set in a colander inside a bowl.

Covering with Cheesecloth

When the curds are all in the cheesecloth, I fold up all sides of the cloth, making a neat package.

Pressing the Tofu

I put the cover onto the tofu press and gently press down to remove the remaining whey. To make it extra firm, I put a weight, such as a large can of tomatoes, on top of the press and leave it for about 15 minutes. When it's finished pressing, I leave the tofu in the press and put it into the refrigerator.

Fresh Homemade Tofu

After a couple of hours in the refrigerator, I unwrap the tofu and it is ready to use. If I don't plan to use it that same day, I put it into a container and cover it with water to keep up to three days. But fresh tofu tastes best that same day, so I rarely store it overnight.

Freshly made tofu has such a great taste that I like to prepare it in simple ways with few ingredients to hide its taste. In my next post I'll show you what I did with this batch of tofu.


Some Questions I've Been Asked about Homemade Soymilk and Tofu:

I only like Silk brand soymilk. Does homemade soymilk taste like Silk?

In a word, no. Homemade soymilk doesn't really taste like any of the brands you buy in the store, and it can take a little getting used to. Some people describe its taste as "beany." But there are a few things you can do to lessen the beany taste.

Okay, so what can you do to get rid of the beany taste?

For one, remove the bean skins. That's not as hard as it sounds, although it does make soymilk making a little more tedious. After the soybeans have soaked for at least 8 hours, drain and rinse them, put them in a large bowl, and fill the bowl with water. Rub the beans between your fingers to remove the skins. When the skins float away from the beans, scoop them up and discard them.

You can also add grains to your soymilk to lessen the beany taste. I've only used oatmeal, but other people include rice and other grains. Personally, I add 3 tablespoons of rolled oats (regular Quaker oatmeal) to the machine along with the soybeans; it makes the milk thicker and less likely to separate (but don't add it if you're making tofu).

Finally, I find that adding sweetener and salt make the milk taste a lot more like packaged soymilk. For vanilla soymilk, I add 2 to 3 tablespoons of agave nectar and 1/4 teaspoon of salt after the final straining. (To make vanilla soymilk, I break up two vanilla beans and add them along with the soybeans; unfortunately, this creates vanilla okara, which means I have to make cookies. Oh, well!)

If you make soymilk at home, aren't you missing out on the vitamins and minerals that are added to the packaged products?

I figure it this way: Those nutrients are just supplements that someone else has added. I think my family and I are better off drinking freshly made soymilk, without thickeners and preservatives, and taking our own supplements, such as calcium and vitamin B-12. I'm actually happier buying vitamins and minerals in pill form because I can get them from a source that I trust to be vegan.

For more information, particularly about making tofu without a soymilk maker, check out How to Make Tofu on the Just Hungry blog and Making Homemade Tofu on Bryanna Clark Grogan's website.


If you've read this far, good for you! Or, wait...did you just skip down here to find out how you can win a free machine? Hmmm. I guess I'll tell you, but you have to promise to go up and read the whole post--or at least look at the pictures!

Here's the situation: the nice people at SoyQuick sent me one of their new filterless machines for free, hoping that I'd like it and talk about it here. And they were right! I do like it and I did want to talk about it here. I'd planned to try it and then give it away because I already have one of their regular models, only I didn't expect to like it so much more than my old one. So I'm keeping it! Sorry!

But wait! I won't give you mine but I will order one lucky reader a brand new one. If you live in the continental U.S. or Canada, leave a comment below, and I'll have the random number generator choose one of you to win a filterless SoyQuick Premier that I'll order straight from the company. I'll even throw in a tofu kit like the one I use, so that you can experience the taste of fresh tofu. In the comments, be sure to leave your name (first and last for those of you with common first names) and tell me why you want a soymilk maker (that's just for fun--the winner is random and not based on your answer, so you can be honest and say if you just want to sell it on ebay!)

One comment per person, please. Comments will close at 10:00 AM Central Time on Sunday, October 5, and I'll announce the winner later that day.

Sorry--this contest is open only to those of you in the continental U.S. and Canada.

Good luck!
[Note about comments: Only the first 200 show up below this post. Click on Post a Comment in order to see all of them. Please submit your comment only once. Though you may not see it at first, it will show up.]

Labels:

Bookmark and Share AddThis Feed Button