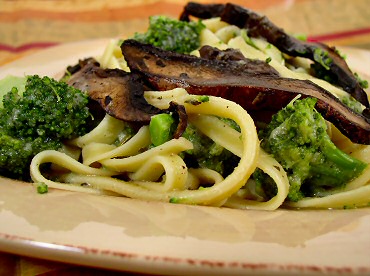
Hasty Tasty Pasta with Broccoli, Olives, and "Chicken"
Yesterday was a long day. My daughter E. had her birthday party (two weeks late because of her hectic soccer schedule) at a local amusement facility. There were arcade games and ice skating as well as the ritual cake and birthday presents. I found out something the hard way: it's almost impossible to get kids out of those places once you've allowed them in. Between the game tokens that absolutely must be used up that day and the standing in line to redeem game points for prizes, the party lasted a lot longer than we intended.
And, when we got home, we had one extra child with us: E. had invited her best friend to eat dinner and spend the night. The only problem was I had no idea what was for dinner and no energy for cooking. Fortunately, I had a package of the new Morningstar Farms Chick'n Strips* in the freezer for just such a situation. I'd never tried them before, and faux meats are not something I recommend eating frequently, but on this occasion, they really came in handy and turned out to be pretty tasty.
In this recipe I used a little more olive oil than I usually do, but it can be prepared with as little or as much as you want. The dish also contains black olives and pine nuts, so it's fairly rich even without the oil.

Hasty Tasty Pasta with Broccoli, Olives, and "Chicken"
1 pound pasta (I recommend rotini;I used spaghetti because that's all I had)
1 large bunch broccoli, cut into florets, stems peeled and sliced
1 package fake chicken strips (optional)
1 tsp. to 2 tbsp. good olive oil (to taste)
4-6 cloves garlic, minced
1/8 cup pine nuts
1 1/2 tsp. dried basil
1/8 tsp. red pepper flakes
black pepper to taste
salt to taste
small black olives, to taste
Bring a large pot of water to a boil and add the pasta and salt (if desired). Cook until the pasta is almost done (with about 2 minutes of cooking time left). Add the broccoli to the pasta and cover. Cook for 2 minutes, until broccoli and pasta are just barely tender (al dente) and broccoli is bright green. Remove 1 cup of the cooking water and reserve it; drain the pasta and put it into a large serving bowl. Toss with a teaspoon of olive oil, if desired.
While the pasta is cooking, sauté the chick'n strips in a non-stick skillet sprayed with olive oil until brown. Remove them to the serving bowl. Add as much olive oil to the skillet as you want to use, heat it and add the garlic and pine nuts. Stir and cook until the pine nuts just start to brown. Remove from the heat and add the reserved cup of pasta cooking water--carefully to avoid spattering. Return to the heat, add the basil, red pepper, black pepper, and salt, and stir and cook until slightly thickened. Pour it over the pasta and chick'n strips, add the black olives, toss well, and serve.
*The Morningstar Farms Meal Starters Chick'n and Steak Strips are two of the very few vegan products that Morningstar offers. Other "chicken"-type products can be used in this recipe, and, truthfully, I advocate buying products from a more vegan-friendly (and less multi-national) company, if you can.
And, when we got home, we had one extra child with us: E. had invited her best friend to eat dinner and spend the night. The only problem was I had no idea what was for dinner and no energy for cooking. Fortunately, I had a package of the new Morningstar Farms Chick'n Strips* in the freezer for just such a situation. I'd never tried them before, and faux meats are not something I recommend eating frequently, but on this occasion, they really came in handy and turned out to be pretty tasty.
In this recipe I used a little more olive oil than I usually do, but it can be prepared with as little or as much as you want. The dish also contains black olives and pine nuts, so it's fairly rich even without the oil.
Hasty Tasty Pasta with Broccoli, Olives, and "Chicken"
1 pound pasta (I recommend rotini;I used spaghetti because that's all I had)
1 large bunch broccoli, cut into florets, stems peeled and sliced
1 package fake chicken strips (optional)
1 tsp. to 2 tbsp. good olive oil (to taste)
4-6 cloves garlic, minced
1/8 cup pine nuts
1 1/2 tsp. dried basil
1/8 tsp. red pepper flakes
black pepper to taste
salt to taste
small black olives, to taste
Bring a large pot of water to a boil and add the pasta and salt (if desired). Cook until the pasta is almost done (with about 2 minutes of cooking time left). Add the broccoli to the pasta and cover. Cook for 2 minutes, until broccoli and pasta are just barely tender (al dente) and broccoli is bright green. Remove 1 cup of the cooking water and reserve it; drain the pasta and put it into a large serving bowl. Toss with a teaspoon of olive oil, if desired.
While the pasta is cooking, sauté the chick'n strips in a non-stick skillet sprayed with olive oil until brown. Remove them to the serving bowl. Add as much olive oil to the skillet as you want to use, heat it and add the garlic and pine nuts. Stir and cook until the pine nuts just start to brown. Remove from the heat and add the reserved cup of pasta cooking water--carefully to avoid spattering. Return to the heat, add the basil, red pepper, black pepper, and salt, and stir and cook until slightly thickened. Pour it over the pasta and chick'n strips, add the black olives, toss well, and serve.

*The Morningstar Farms Meal Starters Chick'n and Steak Strips are two of the very few vegan products that Morningstar offers. Other "chicken"-type products can be used in this recipe, and, truthfully, I advocate buying products from a more vegan-friendly (and less multi-national) company, if you can.
Tags: vegan recipes vegetarian cooking food fat-free
Labels: higher-fat, pasta
posted by SusanV at 9:38 AM
9 comments
links to this post
![]()
![]()